# spring初识
# 框架
框架就是一些类和接口的集合,通过这些类和接口协调来完成一系列的程序实现。JAVA框架可以分为三层:表示层,业务层和物理层。框架又叫做开发中的半成品,它不能提供整个WEB应用程序的所有东西,但是有了框架,我们就可以集中精力进行业务逻辑的开发而不用去关心它的技术实现以及一些辅助的业务逻辑。大家熟知的Structs和Spring就是表示层和业务层框架的强力代表。(说的太官方了)
人话:
框架就是某些个人或者组织定义了一系列的类或者接口,提前定义好了一些实现,用户可以在这些类和接口的基础之上,使用这些类来迅速的形成某个领域或者某个行业的解决方案,简化开发的过程,提高开发的效率。就好比:你要盖一座房子,先把柱子,房梁等先建设好,然后只需要向房子中填充就可以了,可以按照自己的需求进行设计,其实我们做的项目、系统都是类似的方式,如果所有的代码全部都需要自己实现,那么这个工程就太庞大了,所以可以先创建出一些基础的模板框架,开发人员只需要按照自己的需求向架子中填充内容,完成自己独特需求即可,这就是框架存在的意义。其实我们之前定义的简单的工具类这些东西也是类似的原理,只不过比较单一简单而已,因此,在现在的很多项目系统开发的过程中都是利用框架进行开发。
# 架构设计
随着互联网的发展,网站应用的规模不断扩大,常规的垂直应用架构已无法应对,分布式服务架构以及流动计算架构势在必行,亟需一个治理系统确保架构有条不紊的演进。

# 单一应用架构
当网站流量很小时,只需一个应用,将所有功能都部署在一起,以减少部署节点和成本。此时,用于简化增删改查工作量的数据访问框架(ORM)是关键。
# 垂直应用架构
当访问量逐渐增大,单一应用增加机器带来的加速度越来越小,提升效率的方法之一是将应用拆成互不相干的几个应用,以提升效率。此时,用于加速前端页面开发的Web框架(MVC)是关键。
# 分布式服务架构
当垂直应用越来越多,应用之间交互不可避免,将核心业务抽取出来,作为独立的服务,逐渐形成稳定的服务中心,使前端应用能更快速的响应多变的市场需求。此时,用于提高业务复用及整合的分布式服务框架(RPC)是关键。
# 流动计算架构
当服务越来越多,容量的评估,小服务资源的浪费等问题逐渐显现,此时需增加一个调度中心基于访问压力实时管理集群容量,提高集群利用率。此时,用于提高机器利用率的资源调度和治理中心(SOA)是关键。
# Java主流框架演变之路
JSP+Servlet+JavaBean
MVC三层架构

EJB
使用EJB进行应用的开发,但是EJB是重量级框架(在使用的时候,过多的接口和依赖,侵入性强),在使用上比较麻烦
Struts1/Struts2+Hibernate+Spring
SpringMVC+Mybatis+Spring
SpringBoot开发,约定大于配置
# Spring官网
官网地址:https://spring.io/projects/spring-framework#overview
压缩包下载地址:https://repo.spring.io/release/org/springframework/spring/
源码地址:https://github.com/spring-projects/spring-framework
Spring makes it easy to create Java enterprise applications. It provides everything you need to embrace the Java language in an enterprise environment, with support for Groovy and Kotlin as alternative languages on the JVM, and with the flexibility to create many kinds of architectures depending on an application’s needs. As of Spring Framework 5.1, Spring requires JDK 8+ (Java SE 8+) and provides out-of-the-box support for JDK 11 LTS. Java SE 8 update 60 is suggested as the minimum patch release for Java 8, but it is generally recommended to use a recent patch release.
Spring supports a wide range of application scenarios. In a large enterprise, applications often exist for a long time and have to run on a JDK and application server whose upgrade cycle is beyond developer control. Others may run as a single jar with the server embedded, possibly in a cloud environment. Yet others may be standalone applications (such as batch or integration workloads) that do not need a server.
Spring is open source. It has a large and active community that provides continuous feedback based on a diverse range of real-world use cases. This has helped Spring to successfully evolve over a very long time.
Spring 使创建 Java 企业应用程序变得更加容易。它提供了在企业环境中接受 Java 语言所需的一切,,并支持 Groovy 和 Kotlin 作为 JVM 上的替代语言,并可根据应用程序的需要灵活地创建多种体系结构。 从 Spring Framework 5.0 开始,Spring 需要 JDK 8(Java SE 8+),并且已经为 JDK 9 提供了现成的支持。
Spring支持各种应用场景, 在大型企业中, 应用程序通常需要运行很长时间,而且必须运行在 jdk 和应用服务器上,这种场景开发人员无法控制其升级周期。 其他可能作为一个单独的jar嵌入到服务器去运行,也有可能在云环境中。还有一些可能是不需要服务器的独立应用程序(如批处理或集成的工作任务)。
Spring 是开源的。它拥有一个庞大而且活跃的社区,提供不同范围的,真实用户的持续反馈。这也帮助Spring不断地改进,不断发展。
# 核心解释
spring是一个开源框架。
spring是为了简化企业开发而生的,使得开发变得更加优雅和简洁。
spring是一个IOC和AOP的容器框架。
			1. IOC:控制反转
			2. AOP:面向切面编程
                    				3. 容器:包含并管理应用对象的生命周期,就好比用桶装水一样,spring就是桶,而对象就是水
# 使用spring的优点
- Spring通过DI、AOP和消除样板式代码来简化企业级Java开发
- Spring框架之外还存在一个构建在核心框架之上的庞大生态圈,它将Spring扩展到不同的领域,如Web服务、REST、移动开发以及NoSQL
- 低侵入式设计,代码的污染极低
- 独立于各种应用服务器,基于Spring框架的应用,可以真正实现Write Once,Run Anywhere的承诺
- Spring的IoC容器降低了业务对象替换的复杂性,提高了组件之间的解耦
- Spring的AOP支持允许将一些通用任务如安全、事务、日志等进行集中式处理,从而提供了更好的复用
- Spring的ORM和DAO提供了与第三方持久层框架的的良好整合,并简化了底层的数据库访问
- Spring的高度开放性,并不强制应用完全依赖于Spring,开发者可自由选用Spring框架的部分或全部
# 如何简化开发
- 基于POJO的轻量级和最小侵入性编程
- 通过依赖注入和面向接口实现松耦合
- 基于切面和惯例进行声明式编程
- 通过切面和模板减少样板式代码
# spring的模块划分图
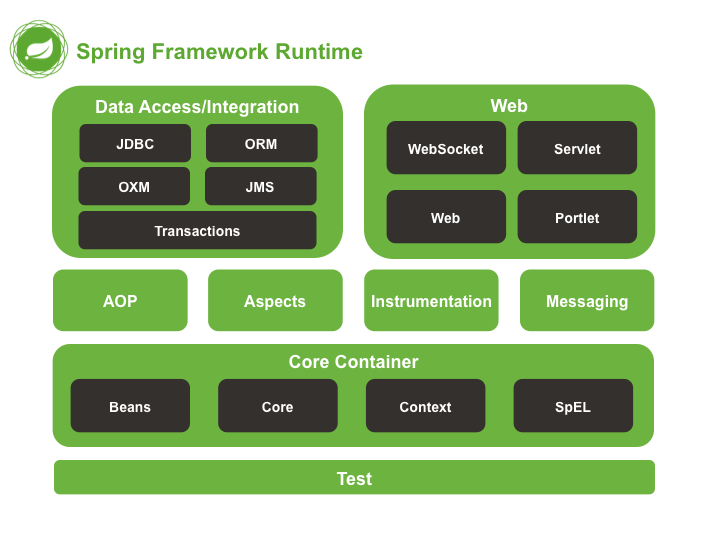
模块解释:
Test:Spring的单元测试模块
Core Container:核心容器模块
AOP+Aspects:面向切面编程模块
Instrumentation:提供了class instrumentation支持和类加载器的实现来在特定的应用服务器上使用,几乎不用
Messaging:包括一系列的用来映射消息到方法的注解,几乎不用
Data Access/Integration:数据的获取/整合模块,包括了JDBC,ORM,OXM,JMS和事务模块
Web:提供面向web整合特性
# IOC(Inversion of Control):控制反转
# 为什么要引入IOC
创建一个普通的java项目,完成下述功能
UserDao.java
package com.mashibing.dao;

public interface UserDao {
    public void getUser();
}
UserDaoImpl.java
package com.mashibing.dao.impl;

import com.mashibing.dao.UserDao;

public class UserDaoImpl  implements UserDao {
    @Override
    public void getUser() {
        System.out.println("获取用户数据");
    }
}
UserService.java
package com.mashibing.service;

public interface UserService {
    public void getUser();
}
UserServiceImpl.java
package com.mashibing.service.impl;

import com.mashibing.dao.UserDao;
import com.mashibing.dao.impl.UserDaoImpl;
import com.mashibing.dao.impl.UserDaoMysqlImpl;
import com.mashibing.service.UserService;

public class UserServiceImpl implements UserService {

    private UserDao userDao = new UserDaoImpl();

    @Override
    public void getUser() {
        userDao.getUser();
    }
}
SpringDemoTest.java
package com.mashibing.test;

import com.mashibing.service.UserService;
import com.mashibing.service.impl.UserServiceImpl;

public class SpringDemoTest {
    public static void main(String[] args) {
       UserService service = new UserServiceImpl();
       service.getUser();
    }
}
在之前的代码编写过程中,我们都是这么完成我们的功能的,但是如果增加一个UserDao的实现类呢?
UserDaoMysqlImpl.java
package com.mashibing.dao.impl;

import com.mashibing.dao.UserDao;

public class UserDaoMysqlImpl implements UserDao {
    @Override
    public void getUser() {
        System.out.println("mysql");
    }
}
如果我们想要使用mysql的话,那么就必须要修改UserServiceImpl.java的代码:
package com.mashibing.service.impl;

import com.mashibing.dao.UserDao;
import com.mashibing.dao.impl.UserDaoImpl;
import com.mashibing.dao.impl.UserDaoMysqlImpl;
import com.mashibing.service.UserService;

public class UserServiceImpl implements UserService {

    private UserDao userDao = new UserDaoImpl();

    @Override
    public void getUser() {
        userDao.getUser();
    }
}
但是如果我们再增加一个oracle的类呢?
UserDaoOracleImpl.java
package com.mashibing.dao.impl;

import com.mashibing.dao.UserDao;

public class UserDaoOracleImpl implements UserDao {
    @Override
    public void getUser() {
        System.out.println("oracle");
    }
}
此时UserService还是要继续修改,很显然这样的方式已经不适用于我们的需求了,那么怎么解决呢,可以使用如下的方式
UserServiceImpl.java
package com.mashibing.service.impl;

import com.mashibing.dao.UserDao;
import com.mashibing.dao.impl.UserDaoImpl;
import com.mashibing.service.UserService;

public class UserServiceImpl implements UserService {
    private UserDao userDao;

    public void setUserDao(UserDao userDao){
        this.userDao = userDao;
    }
    @Override
    public void getUser() {
        userDao.getUser();
    }
}
测试类SpringDemoTest.java
package com.mashibing.test;

import com.mashibing.dao.impl.UserDaoMysqlImpl;
import com.mashibing.dao.impl.UserDaoOracleImpl;
import com.mashibing.service.UserService;
import com.mashibing.service.impl.UserServiceImpl;

public class SpringDemoTest {
    public static void main(String[] args) {
        UserServiceImpl userService = new UserServiceImpl();
        userService.setUserDao(new UserDaoMysqlImpl());
        userService.getUser();

        userService.setUserDao(new UserDaoOracleImpl());
        userService.getUser();
    }
}
其实从刚刚的代码中,大家应该能体会解耦的重要性了,下面我们就开始学习Spring的IOC。
# IOC初始
想要搞明白IOC,那么需要搞清楚如下几个问题:
1、谁控制谁
2、控制什么
3、什么是反转
4、哪些方面被反转
基本概念
	IoC is also known as dependency injection (DI). It is a process whereby objects define their dependencies (that is, the other objects they work with) only through constructor arguments, arguments to a factory method, or properties that are set on the object instance after it is constructed or returned from a factory method. The container then injects those dependencies when it creates the bean. This process is fundamentally the inverse (hence the name, Inversion of Control) of the bean itself controlling the instantiation or location of its dependencies by using direct construction of classes or a mechanism such as the Service Locator pattern.
	IOC与大家熟知的依赖注入同理,. 这是一个通过依赖注入对象的过程 也就是说,它们所使用的对象,是通过构造函数参数,工厂方法的参数或这是从工厂方法的构造函数或返回值的对象实例设置的属性,然后容器在创建bean时注入这些需要的依赖。 这个过程相对普通创建对象的过程是反向的(因此称之为IoC),bean本身通过直接构造类来控制依赖关系的实例化或位置,或提供诸如服务定位器模式之类的机制。
如果这个过程比较难理解的话,那么可以想象自己找女朋友和婚介公司找女朋友的过程。如果这个过程能够想明白的话,那么我们现在回答上面的问题:
1、谁控制谁:在之前的编码过程中,都是需要什么对象自己去创建什么对象,有程序员自己来控制对象,而有了IOC容器之后,就会变成由IOC容器来控制对象,
2、控制什么:在实现过程中所需要的对象及需要依赖的对象
3、什么是反转:在没有IOC容器之前我们都是在对象中主动去创建依赖的对象,这是正转的,而有了IOC之后,依赖的对象直接由IOC容器创建后注入到对象中,由主动创建变成了被动接受,这是反转
4、哪些方面被反转:依赖的对象
# DI与IOC
很多人把IOC和DI说成一个东西,笼统来说的话是没有问题的,但是本质上还是有所区别的,希望大家能够严谨一点,IOC和DI是从不同的角度描述的同一件事,IOC是从容器的角度描述,而DI是从应用程序的角度来描述,也可以这样说,IOC是设计思想,而DI是具体的实现方式
# 总结
在此处总结中,希望大家能够能够明白两件事:
# 解耦
在面向对象设计的软件系统中,底层的实现都是由N个对象组成的,所有的对象通过彼此的合作,最终实现系统的业务逻辑。
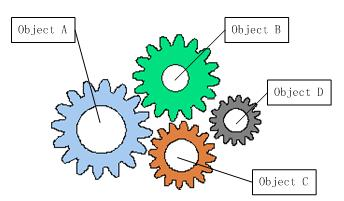
需要注意的是,在这样的组合关系中,一旦某一个对象出现了问题,那么其他对象肯定回有所影响,这就是耦合性太高的缘故,但是对象的耦合关系是无法避免的,也是必要的。随着应用程序越来越庞大,对象的耦合关系可能越来越复杂,经常需要多重依赖关系,因此,无论是架构师还是程序员,在面临这样的场景的时候,都需要减少这些对象的耦合性。
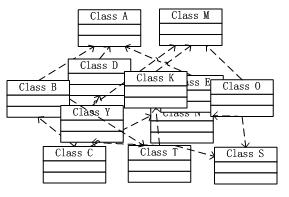
耦合的关系不仅仅是对象与对象之间,也会出现在软件系统的各个模块之间,是我们需要重点解决的问题。而为了解决对象之间的耦合度过高的问题,我们就可以通过IOC来实现对象之间的解耦,spring框架就是IOC理论最最广泛的应用。
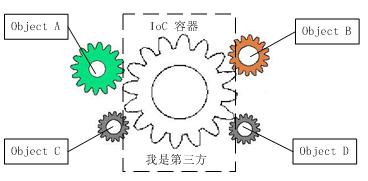
从上图中可以看到,当引入了第三方的容器之后,几个对象之间就没有了耦合关系,全部对象都交由容器来控制,这个容器就相当于粘合剂,将系统的对象粘合在一起发挥作用。
# 生态
任何一个语言或者任何一个框架想要立于不败之地,那么很重要的就是它的生态。
# spring IOC基本使用
通过前面的介绍我们已经知道了Spring中非常重要的一个特性就是IOC,下面我们将要来看一下如何使用IOC容器,帮助大家更好的体会spring的优势。
# 创建 spring_helloworld 工程详解
# 使用手动加载jar包的方式实现
导包:导入这六个包即可
commons-logging-1.2.jar spring-beans-5.2.3.RELEASE.jar spring-context-5.2.3.RELEASE.jar spring-core-5.2.3.RELEASE.jar spring-expression-5.2.3.RELEASE.jar
lombok-1.18.12.jar
写配置
Person.java
package com.mashibing.bean;

@Data
@Accessors(chain = true)
@EqualsAndHashCode(callSuper = true)
public class Person {
    private int id;
    private String name;
    private int age;
    private String gender;
}
ioc.xml
<?xml version="1.0" encoding="UTF-8"?>
<beans xmlns="http://www.springframework.org/schema/beans"
       xmlns:xsi="http://www.w3.org/2001/XMLSchema-instance"
       xsi:schemaLocation="http://www.springframework.org/schema/beans http://www.springframework.org/schema/beans/spring-beans.xsd">

    <!--注册一个对象,spring回自动创建这个对象-->
    <!--
    一个bean标签就表示一个对象
    id:这个对象的唯一标识
    class:注册对象的完全限定名
    -->
    <bean id="person" class="com.mashibing.bean.Person">
        <!--使用property标签给对象的属性赋值
        name:表示属性的名称
        value:表示属性的值
        -->
        <property name="id" value="1"></property>
        <property name="name" value="zhangsan"></property>
        <property name="age" value="18"></property>
        <property name="gender" value="男"></property>
    </bean>
</beans>
测试
SpringDemoTest.java
package com.mashibing.test;

import com.mashibing.bean.Person;
import org.springframework.context.ApplicationContext;
import org.springframework.context.support.ClassPathXmlApplicationContext;

public class SpringDemoTest {
    public static void main(String[] args) {
        //ApplicationContext:表示ioc容器
        //ClassPathXmlApplicationContext:表示从当前classpath路径中获取xml文件的配置
        //根据spring的配置文件来获取ioc容器对象
        ApplicationContext context = new ClassPathXmlApplicationContext("ioc.xml");
        Person person = (Person) context.getBean("person");
        System.out.println(person);
    }
}
# 使用maven的方式来构建项目
创建maven项目
定义项目的groupId、artifactId
添加对应的pom依赖
pom.xml
<?xml version="1.0" encoding="UTF-8"?>
<project xmlns="http://maven.apache.org/POM/4.0.0"
         xmlns:xsi="http://www.w3.org/2001/XMLSchema-instance"
         xsi:schemaLocation="http://maven.apache.org/POM/4.0.0 http://maven.apache.org/xsd/maven-4.0.0.xsd">
    <modelVersion>4.0.0</modelVersion>

    <groupId>com.mashibing</groupId>
    <artifactId>spring_demo</artifactId>
    <version>1.0-SNAPSHOT</version>

    <dependencies>
        <!-- https://mvnrepository.com/artifact/org.springframework/spring-context -->
        <dependency>
            <groupId>org.springframework</groupId>
            <artifactId>spring-context</artifactId>
            <version>5.2.3.RELEASE</version>
        </dependency>
        <dependency>
            <groupId>org.projectlombok</groupId>
            <artifactId>lombok</artifactId>
            <version>1.18.12</version>
            <scope>provided</scope>
        </dependency>
    </dependencies>
</project>
编写代码
Person.java
package com.mashibing.bean;

@Data
@Accessors(chain = true)
@EqualsAndHashCode(callSuper = true)
public class Person {
    private int id;
    private String name;
    private int age;
    private String gender;
}
测试
MyTest.java
import com.mashibing.bean.Person;
import org.springframework.context.ApplicationContext;
import org.springframework.context.support.ClassPathXmlApplicationContext;

public class MyTest {
    public static void main(String[] args) {
        ApplicationContext context = new ClassPathXmlApplicationContext("ioc.xml");
        Person person = (Person) context.getBean("person");
        System.out.println(person);
    }
}
# 总结:
以上两种方式创建spring的项目都是可以的,但是在现在的企业开发环境中使用更多的还是maven这样的方式,无须自己处理jar之间的依赖关系,也无须提前下载jar包,只需要配置相关的pom即可,因此推荐大家使用maven的方式,具体的maven操作大家可以看maven的详细操作文档。
# 搭建spring项目需要注意的点
- 一定要将配置文件添加到类路径中,使用idea创建项目的时候要放在resource目录下
- 导包的时候别忘了commons-logging-1.2.jar包
# 细节点
- ApplicationContext就是IOC容器的接口,可以通过此对象获取容器中创建的对象
- 对象在Spring容器创建完成的时候就已经创建完成,不是需要用的时候才创建
- 对象在IOC容器中存储的时候都是单例的,如果需要多例需要修改属性
- 创建对象给属性赋值的时候是通过setter方法实现的
- 对象的属性是由setter/getter方法决定的,而不是定义的成员属性
# spring对象的获取及属性赋值方式
# 1. 通过bean的id获取IOC容器中的对象
# 2. 通过bean的类型获取对象
import com.mashibing.bean.Person;
import org.springframework.context.ApplicationContext;
import org.springframework.context.support.ClassPathXmlApplicationContext;

public class MyTest {
    public static void main(String[] args) {
        ApplicationContext context = new ClassPathXmlApplicationContext("ioc.xml");
        Person bean = context.getBean(Person.class);
        System.out.println(bean);
    }
}
注意:通过bean的类型在查找对象的时候,在配置文件中不能存在两个类型一致的bean对象,如果有的话,可以通过如下方法
MyTest.java
import com.mashibing.bean.Person;
import org.springframework.context.ApplicationContext;
import org.springframework.context.support.ClassPathXmlApplicationContext;

public class MyTest {
    public static void main(String[] args) {
        ApplicationContext context = new ClassPathXmlApplicationContext("ioc.xml");
        Person person = context.getBean("person", Person.class);
        System.out.println(person);
    }
}
# 3. 通过构造器给bean对象赋值
ioc.xml
<!--给person类添加构造方法-->
<bean id="person2" class="com.mashibing.bean.Person">
    <constructor-arg name="id" value="1"></constructor-arg>
    <constructor-arg name="name" value="lisi"></constructor-arg>
    <constructor-arg name="age" value="20"></constructor-arg>
    <constructor-arg name="gender" value="女"></constructor-arg>
</bean>

<!--在使用构造器赋值的时候可以省略name属性,但是此时就要求必须严格按照构造器参数的顺序来填写了-->
<bean id="person3" class="com.mashibing.bean.Person">
    <constructor-arg value="1"></constructor-arg>
    <constructor-arg value="lisi"></constructor-arg>
    <constructor-arg value="20"></constructor-arg>
    <constructor-arg value="女"></constructor-arg>
</bean>

<!--如果想不按照顺序来添加参数值,那么可以搭配index属性来使用-->
<bean id="person4" class="com.mashibing.bean.Person">
    <constructor-arg value="lisi" index="1"></constructor-arg>
    <constructor-arg value="1" index="0"></constructor-arg>
    <constructor-arg value="女" index="3"></constructor-arg>
    <constructor-arg value="20" index="2"></constructor-arg>
</bean>
<!--当有多个参数个数相同,不同类型的构造器的时候,可以通过type来强制类型-->
将person的age类型设置为Integer类型
public Person(int id, String name, Integer age) {
this.id = id;
this.name = name;
this.age = age;
System.out.println("Age");
}

public Person(int id, String name, String gender) {
this.id = id;
this.name = name;
this.gender = gender;
System.out.println("gender");
}
<bean id="person5" class="com.mashibing.bean.Person">
    <constructor-arg value="1"></constructor-arg>
    <constructor-arg value="lisi"></constructor-arg>
    <constructor-arg value="20" type="java.lang.Integer"></constructor-arg>
</bean>
<!--如果不修改为integer类型,那么需要type跟index组合使用-->
<bean id="person5" class="com.mashibing.bean.Person">
    <constructor-arg value="1"></constructor-arg>
    <constructor-arg value="lisi"></constructor-arg>
    <constructor-arg value="20" type="int" index="2"></constructor-arg>
</bean>
# 4. 通过命名空间为bean赋值,简化配置文件中属性声明的写法
导入命名空间
<?xml version="1.0" encoding="UTF-8"?>
<beans xmlns="http://www.springframework.org/schema/beans"
       xmlns:xsi="http://www.w3.org/2001/XMLSchema-instance"
       xmlns:p="http://www.springframework.org/schema/p"
       xsi:schemaLocation="http://www.springframework.org/schema/beans http://www.springframework.org/schema/beans/spring-beans.xsd">
添加配置
<bean id="person6" class="com.mashibing.bean.Person" p:id="3" p:name="wangwu" p:age="22" p:gender="男"></bean>
# 5. 为复杂类型进行赋值操作
在之前的测试代码中,我们都是给最基本的属性进行赋值操作,在正常的企业级开发中还会遇到给各种复杂类型赋值,如集合、数组、其他对象等。
Person.java
package com.mashibing.bean;

import java.util.*;

@Data
@Accessors(chain = true)
@EqualsAndHashCode(callSuper = true)
public class Person {
    private int id;
    private String name="dahuang";
    private int age;
    private String gender;
    private Address address;
    private String[] hobbies;
    private List<Book> books;
    private Set<Integer> sets;
    private Map<String,Object> maps;
    private Properties properties;

    public Person(int id, String name, int age, String gender) {
        this.id = id;
        this.name = name;
        this.age = age;
        this.gender = gender;
        System.out.println("有参构造器");
    }

    public Person(int id, String name, int age) {
        this.id = id;
        this.name = name;
        this.age = age;
        System.out.println("Age");
    }

    public Person(int id, String name, String gender) {
        this.id = id;
        this.name = name;
        this.gender = gender;
        System.out.println("gender");
    }

    public Person() {
    }
}
Book.java
package com.mashibing.bean;

@Data
@Accessors(chain = true)
@EqualsAndHashCode(callSuper = true)
public class Book {
    private String name;
    private String author;
    private double price;

    public Book() {
    }

    public Book(String name, String author, double price) {
        this.name = name;
        this.author = author;
        this.price = price;
    }
}
Address.java
package com.mashibing.bean;

@Data
@Accessors(chain = true)
@EqualsAndHashCode(callSuper = true)
public class Address {
    private String province;
    private String city;
    private String town;

    public Address() {
    }

    public Address(String province, String city, String town) {
        this.province = province;
        this.city = city;
        this.town = town;
    }
}
ioc.xml
<?xml version="1.0" encoding="UTF-8"?>
<beans xmlns="http://www.springframework.org/schema/beans"
       xmlns:xsi="http://www.w3.org/2001/XMLSchema-instance"
       xmlns:p="http://www.springframework.org/schema/p"
       xmlns:util="http://www.springframework.org/schema/util"
       xsi:schemaLocation="http://www.springframework.org/schema/beans http://www.springframework.org/schema/beans/spring-beans.xsd
                           http://www.springframework.org/schema/util https://www.springframework.org/schema/util/spring-util.xsd"
       >

    <!--给复杂类型的赋值都在property标签内进行-->
    <bean id="person" class="com.mashibing.bean.Person">
        <property name="name">
            <!--赋空值-->
            <null></null>
        </property>
        <!--通过ref引用其他对象,引用外部bean-->
        <property name="address" ref="address"></property>
        <!--引用内部bean-->
        <!-- <property name="address">
            <bean class="com.mashibing.bean.Address">
                <property name="province" value="北京"></property>
                <property name="city" value="北京"></property>
                <property name="town" value="西城区"></property>
            </bean>
        </property>-->
        <!--为list赋值-->
        <property name="books">
            <list>
                <!--内部bean-->
                <bean id="book1" class="com.mashibing.bean.Book">
                    <property name="name" value="多线程与高并发"></property>
                    <property name="author" value="马士兵"></property>
                    <property name="price" value="1000"></property>
                </bean>
                <!--外部bean-->
                <ref bean="book2"></ref>
            </list>
        </property>
        <!--给map赋值-->
        <property name="maps" ref="myMap"></property>
        <!--给property赋值-->
        <property name="properties">
            <props>
                <prop key="aaa">aaa</prop>
                <prop key="bbb">222</prop>
            </props>
        </property>
        <!--给数组赋值-->
        <property name="hobbies">
            <array>
                <value>book</value>
                <value>movie</value>
                <value>game</value>
            </array>
        </property>
        <!--给set赋值-->
        <property name="sets">
            <set>
                <value>111</value>
                <value>222</value>
                <value>222</value>
            </set>
        </property>
    </bean>
    <bean id="address" class="com.mashibing.bean.Address">
        <property name="province" value="河北"></property>
        <property name="city" value="邯郸"></property>
        <property name="town" value="武安"></property>
    </bean>
    <bean id="book2" class="com.mashibing.bean.Book">
        <property name="name" value="JVM"></property>
        <property name="author" value="马士兵"></property>
        <property name="price" value="1200"></property>
    </bean>
    <!--级联属性-->
    <bean id="person2" class="com.mashibing.bean.Person">
        <property name="address" ref="address"></property>
        <property name="address.province" value="北京"></property>
    </bean>
    <!--util名称空间创建集合类型的bean-->
    <util:map id="myMap">
        <entry key="key1" value="value1"></entry>
        <entry key="key2" value-ref="book2"></entry>
        <entry key="key03">
            <bean class="com.mashibing.bean.Book">
                <property name="name" value="西游记" ></property>
                <property name="author" value="吴承恩" ></property>
                <property name="price" value="100" ></property>
            </bean>
        </entry>
    </util:map>
</beans>
# 6. 继承关系bean的配置
ioc.xml
<bean id="person" class="com.mashibing.bean.Person">
    <property name="id" value="1"></property>
    <property name="name" value="zhangsan"></property>
    <property name="age" value="21"></property>
    <property name="gender" value="男"></property>
</bean>
<!--parent:指定bean的配置信息继承于哪个bean-->
<bean id="person2" class="com.mashibing.bean.Person" parent="person">
    <property name="name" value="lisi"></property>
</bean>
如果想实现Java文件的抽象类,不需要将当前bean实例化的话,可以使用abstract属性
<bean id="person" class="com.mashibing.bean.Person" abstract="true">
    <property name="id" value="1"></property>
    <property name="name" value="zhangsan"></property>
    <property name="age" value="21"></property>
    <property name="gender" value="男"></property>
</bean>
<!--parent:指定bean的配置信息继承于哪个bean-->
<bean id="person2" class="com.mashibing.bean.Person" parent="person">
    <property name="name" value="lisi"></property>
</bean>
# 7. bean对象创建的依赖关系
bean对象在创建的时候是按照bean在配置文件的顺序决定的,也可以使用depend-on标签来决定顺序
ioc.xml
<bean id="book" class="com.mashibing.bean.Book" depends-on="person,address"></bean>
<bean id="address" class="com.mashibing.bean.Address"></bean>
<bean id="person" class="com.mashibing.bean.Person"></bean>
# 8. bean的作用域控制,是否是单例
ioc.xml
<!--
    bean的作用域:singleton、prototype、request、session
    默认情况下是单例的
    prototype:多实例的
        容器启动的时候不会创建多实例bean,只有在获取对象的时候才会创建该对象
        每次创建都是一个新的对象
    singleton:默认的单例对象
        在容器启动完成之前就已经创建好对象
        获取的所有对象都是同一个
    -->
<bean id="person4" class="com.mashibing.bean.Person" scope="prototype"></bean>
# 9. 利用工厂模式创建bean对象
在之前的案例中,所有bean对象的创建都是通过反射得到对应的bean实例,其实在spring中还包含另外一种创建bean实例的方式,就是通过工厂模式进行对象的创建
在利用工厂模式创建bean实例的时候有两种方式,分别是静态工厂和实例工厂。
- 静态工厂:工厂本身不需要创建对象,但是可以通过静态方法调用,对象=工厂类.静态工厂方法名();
- 实例工厂:工厂本身需要创建对象,工厂类 工厂对象=new 工厂类;工厂对象.get对象名();
PersonStaticFactory.java
package com.mashibing.factory;

import com.mashibing.bean.Person;

public class PersonStaticFactory {

    public static Person getPerson(String name){
        Person person = new Person();
        person.setId(1);
        person.setName(name);
        return person;
    }
}
ioc.xml
<!--
静态工厂的使用:
class:指定静态工厂类
factory-method:指定哪个方法是工厂方法
-->
<bean id="person5" class="com.mashibing.factory.PersonStaticFactory" factory-method="getPerson">
    <!--constructor-arg:可以为方法指定参数-->
    <constructor-arg value="lisi"></constructor-arg>
</bean>
PersonInstanceFactory.java
package com.mashibing.factory;

import com.mashibing.bean.Person;

public class PersonInstanceFactory {
    public Person getPerson(String name){
        Person person = new Person();
        person.setId(1);
        person.setName(name);
        return person;
    }
}
ioc.xml
<!--实例工厂使用-->
<!--创建实例工厂类-->
<bean id="personInstanceFactory" class="com.mashibing.factory.PersonInstanceFactory"></bean>
<!--
    factory-bean:指定使用哪个工厂实例
    factory-method:指定使用哪个工厂实例的方法
    -->
<bean id="person6" class="com.mashibing.bean.Person" factory-bean="personInstanceFactory" factory-method="getPerson">
    <constructor-arg value="wangwu"></constructor-arg>
</bean>
# 10. 继承FactoryBean来创建对象
FactoryBean是Spring规定的一个接口,当前接口的实现类,Spring都会将其作为一个工厂,但是在ioc容器启动的时候不会创建实例,只有在使用的时候才会创建对象
MyFactoryBean.java
package com.mashibing.factory;

import com.mashibing.bean.Person;
import org.springframework.beans.factory.FactoryBean;

/**
 * 实现了FactoryBean接口的类是Spring中可以识别的工厂类,spring会自动调用工厂方法创建实例
 */
public class MyFactoryBean implements FactoryBean<Person> {

    /**
     * 工厂方法,返回需要创建的对象
     * @return
     * @throws Exception
     */
    @Override
    public Person getObject() throws Exception {
        Person person = new Person();
        person.setName("maliu");
        return person;
    }

    /**
     * 返回创建对象的类型,spring会自动调用该方法返回对象的类型
     * @return
     */
    @Override
    public Class<?> getObjectType() {
        return Person.class;
    }

    /**
     * 创建的对象是否是单例对象
     * @return
     */
    @Override
    public boolean isSingleton() {
        return false;
    }
}
ioc.xml
<bean id="myfactorybean" class="com.mashibing.factory.MyFactoryBean"></bean>
# 11. bean对象的初始化和销毁方法
在创建对象的时候,我们可以根据需要调用初始化和销毁的方法
Address.java
package com.mashibing.bean;

@Data
@Accessors(chain = true)
@EqualsAndHashCode(callSuper = true)
public class Address {
    private String province;
    private String city;
    private String town;

    public Address() {
        System.out.println("address被创建了");
    }

    public Address(String province, String city, String town) {
        this.province = province;
        this.city = city;
        this.town = town;
    }

    public void init(){
        System.out.println("对象被初始化");
    }

    public void destory(){
        System.out.println("对象被销毁");
    }
}
ioc.xml
<!--bean生命周期表示bean的创建到销毁
        如果bean是单例,容器在启动的时候会创建好,关闭的时候会销毁创建的bean
        如果bean是多礼,获取的时候创建对象,销毁的时候不会有任何的调用
    -->
<bean id="address" class="com.mashibing.bean.Address" init-method="init" destroy-method="destory"></bean>
MyTest.java
import com.mashibing.bean.Address;
import org.springframework.context.ApplicationContext;
import org.springframework.context.support.ClassPathXmlApplicationContext;

public class MyTest {
    public static void main(String[] args) {
        ApplicationContext context = new ClassPathXmlApplicationContext("ioc2.xml");
        Address address = context.getBean("address", Address.class);
        System.out.println(address);
        //applicationContext没有close方法,需要使用具体的子类
        ((ClassPathXmlApplicationContext)context).close();
    }
}
# 12. 配置bean对象初始化方法的前后处理方法
spring中包含一个BeanPostProcessor的接口,可以在bean的初始化方法的前后调用该方法,如果配置了初始化方法的前置和后置处理器,无论是否包含初始化方法,都会进行调用
MyBeanPostProcessor.java
package com.mashibing.bean;

import org.springframework.beans.BeansException;
import org.springframework.beans.factory.config.BeanPostProcessor;

public class MyBeanPostProcessor implements BeanPostProcessor {
    /**
     * 在初始化方法调用之前执行
     * @param bean  初始化的bean对象
     * @param beanName  xml配置文件中的bean的id属性
     * @return
     * @throws BeansException
     */
    @Override
    public Object postProcessBeforeInitialization(Object bean, String beanName) throws BeansException {
        System.out.println("postProcessBeforeInitialization:"+beanName+"调用初始化前置方法");
        return bean;
    }

    /**
     * 在初始化方法调用之后执行
     * @param bean
     * @param beanName
     * @return
     * @throws BeansException
     */
    @Override
    public Object postProcessAfterInitialization(Object bean, String beanName) throws BeansException {
        System.out.println("postProcessAfterInitialization:"+beanName+"调用初始化后缀方法");
        return bean;
    }
}
ioc.xml
<bean id="myBeanPostProcessor" class="com.mashibing.bean.MyBeanPostProcessor"></bean>
# spring创建第三方bean对象
在Spring中,很多对象都是单实例的,在日常的开发中,我们经常需要使用某些外部的单实例对象,例如数据库连接池,下面我们来讲解下如何在spring中创建第三方bean实例。
导入数据库连接池的pom文件
<!-- https://mvnrepository.com/artifact/com.alibaba/druid -->
<dependency>
    <groupId>com.alibaba</groupId>
    <artifactId>druid</artifactId>
    <version>1.1.21</version>
</dependency>
<!-- https://mvnrepository.com/artifact/mysql/mysql-connector-java -->
<dependency>
    <groupId>mysql</groupId>
    <artifactId>mysql-connector-java</artifactId>
    <version>5.1.47</version>
</dependency>
编写配置文件
<?xml version="1.0" encoding="UTF-8"?>
<beans xmlns="http://www.springframework.org/schema/beans"
       xmlns:xsi="http://www.w3.org/2001/XMLSchema-instance"
       xsi:schemaLocation="http://www.springframework.org/schema/beans http://www.springframework.org/schema/beans/spring-beans.xsd">

    <bean id="dataSource" class="com.alibaba.druid.pool.DruidDataSource">
        <property name="username" value="root"></property>
        <property name="password" value="123456"></property>
        <property name="url" value="jdbc:mysql://localhost:3306/demo"></property>
        <property name="driverClassName" value="com.mysql.jdbc.Driver"></property>
    </bean>
</beans>
编写测试文件
import com.alibaba.druid.pool.DruidDataSource;
import com.mashibing.bean.Address;
import com.mashibing.bean.Person;
import org.springframework.context.ApplicationContext;
import org.springframework.context.support.ClassPathXmlApplicationContext;
import java.sql.SQLException;

public class MyTest {
    public static void main(String[] args) throws SQLException {
        ApplicationContext context = new ClassPathXmlApplicationContext("ioc3.xml");
        DruidDataSource dataSource = context.getBean("dataSource", DruidDataSource.class);
        System.out.println(dataSource);
        System.out.println(dataSource.getConnection());
    }
}
# spring引用外部配置文件
在resource中添加 dbconfig.properties
username=root
password=123456
url=jdbc:mysql://localhost:3306/demo
driverClassName=com.mysql.jdbc.Driver
编写配置文件
<?xml version="1.0" encoding="UTF-8"?>
<beans xmlns="http://www.springframework.org/schema/beans"
       xmlns:xsi="http://www.w3.org/2001/XMLSchema-instance"
       xmlns:context="http://www.springframework.org/schema/context"
       xsi:schemaLocation="http://www.springframework.org/schema/beans
       http://www.springframework.org/schema/beans/spring-beans.xsd
        http://www.springframework.org/schema/context
        http://www.springframework.org/schema/context/spring-context.xsd">
	<!--加载外部配置文件
		在加载外部依赖文件的时候需要context命名空间
	-->
    <context:property-placeholder location="classpath:dbconfig.properties"/>
    <bean id="dataSource" class="com.alibaba.druid.pool.DruidDataSource">
        <property name="username" value="${username}"></property>
        <property name="password" value="${password}"></property>
        <property name="url" value="${url}"></property>
        <property name="driverClassName" value="${driverClassName}"></property>
    </bean>
</beans>
# spring基于xml文件的自动装配
当一个对象中需要引用另外一个对象的时候,在之前的配置中我们都是通过property标签来进行手动配置的,其实在spring中还提供了一个非常强大的功能就是自动装配,可以按照我们指定的规则进行配置,配置的方式有以下几种:
default/no:不自动装配
byName:按照名字进行装配,以属性名作为id去容器中查找组件,进行赋值,如果找不到则装配null
byType:按照类型进行装配,以属性的类型作为查找依据去容器中找到这个组件,如果有多个类型相同的bean对象,那么会报异常,如果找不到则装配null
constructor:按照构造器进行装配,先按照有参构造器参数的类型进行装配,没有就直接装配null;如果按照类型找到了多个,那么就使用参数名作为id继续匹配,找到就装配,找不到就装配null
ioc.xml
<?xml version="1.0" encoding="UTF-8"?>
<beans xmlns="http://www.springframework.org/schema/beans"
       xmlns:xsi="http://www.w3.org/2001/XMLSchema-instance"
       xsi:schemaLocation="http://www.springframework.org/schema/beans http://www.springframework.org/schema/beans/spring-beans.xsd">

    <bean id="address" class="com.mashibing.bean.Address">
        <property name="province" value="河北"></property>
        <property name="city" value="邯郸"></property>
        <property name="town" value="武安"></property>
    </bean>
    <bean id="person" class="com.mashibing.bean.Person" autowire="byName"></bean>
    <bean id="person2" class="com.mashibing.bean.Person" autowire="byType"></bean>
    <bean id="person3" class="com.mashibing.bean.Person" autowire="constructor"></bean>
</beans>
# SpEL的使用
SpEL:Spring Expression Language,spring的表达式语言,支持运行时查询操作对象
使用#{...}作为语法规则,所有的大括号中的字符都认为是SpEL.
ioc.xml
<bean id="person4" class="com.mashibing.bean.Person">
    <!--支持任何运算符-->
    <property name="age" value="#{12*2}"></property>
    <!--可以引用其他bean的某个属性值-->
    <property name="name" value="#{address.province}"></property>
    <!--引用其他bean-->
    <property name="address" value="#{address}"></property>
    <!--调用静态方法-->
    <property name="hobbies" value="#{T(java.util.UUID).randomUUID().toString().substring(0,4)}"></property>
    <!--调用非静态方法-->
    <property name="gender" value="#{address.getCity()}"></property>
</bean>
# SpringIOC的注解应用
在之前的项目中,我们都是通过xml文件进行bean或者某些属性的赋值,其实还有另外一种注解的方式,在企业开发中使用的很多,在bean上添加注解,可以快速的将bean注册到ioc容器。
# 1. 使用注解的方式注册bean到IOC容器中
applicationContext.xml
<?xml version="1.0" encoding="UTF-8"?>
<beans xmlns="http://www.springframework.org/schema/beans"
       xmlns:xsi="http://www.w3.org/2001/XMLSchema-instance"
       xmlns:context="http://www.springframework.org/schema/context"
       xsi:schemaLocation="http://www.springframework.org/schema/beans
       http://www.springframework.org/schema/beans/spring-beans.xsd
        http://www.springframework.org/schema/context
        http://www.springframework.org/schema/context/spring-context.xsd">

    <!--
    如果想要将自定义的bean对象添加到IOC容器中,需要在类上添加某些注解
    Spring中包含4个主要的组件添加注解:
    @Controller:控制器,推荐给controller层添加此注解
    @Service:业务逻辑,推荐给业务逻辑层添加此注解
    @Repository:仓库管理,推荐给数据访问层添加此注解
    @Component:给不属于以上基层的组件添加此注解
    注意:我们虽然人为的给不同的层添加不同的注解,但是在spring看来,可以在任意层添加任意注解
           spring底层是不会给具体的层次验证注解,这样写的目的只是为了提高可读性,最偷懒的方式
           就是给所有想交由IOC容器管理的bean对象添加component注解

    使用注解需要如下步骤:
    1、添加上述四个注解中的任意一个
    2、添加自动扫描注解的组件,此操作需要依赖context命名空间
    3、添加自动扫描的标签context:component-scan

	注意:当使用注解注册组件和使用配置文件注册组件是一样的,但是要注意:
		1、组件的id默认就是组件的类名首字符小写,如果非要改名字的话,直接在注解中添加即可
		2、组件默认情况下都是单例的,如果需要配置多例模式的话,可以在注解下添加@Scope注解
    -->
    <!--
    定义自动扫描的基础包:
    base-package:指定扫描的基础包,spring在启动的时候会将基础包及子包下所有加了注解的类都自动
                扫描进IOC容器
    -->
    <context:component-scan base-package="com.mashibing"></context:component-scan>
</beans>
PersonController.java
package com.mashibing.controller;

import org.springframework.stereotype.Controller;

@Controller
public class PersonController {
    public PersonController() {
        System.out.println("创建对象");
    }
}
PersonService.java
package com.mashibing.service;

import org.springframework.stereotype.Service;

@Service
public class PersonService {
}
PersonDao.java
package com.mashibing.dao;

import org.springframework.stereotype.Repository;

@Repository("personDao")
@Scope(value="prototype")
public class PersonDao {
}
# 2. 定义扫描包时要包含的类和不要包含的类
当定义好基础的扫描包后,在某些情况下可能要有选择性的配置是否要注册bean到IOC容器中,此时可以通过如下的方式进行配置。
applicationContext.xml
<?xml version="1.0" encoding="UTF-8"?>
<beans xmlns="http://www.springframework.org/schema/beans"
       xmlns:xsi="http://www.w3.org/2001/XMLSchema-instance"
       xmlns:context="http://www.springframework.org/schema/context"
       xsi:schemaLocation="http://www.springframework.org/schema/beans
       http://www.springframework.org/schema/beans/spring-beans.xsd
        http://www.springframework.org/schema/context
        http://www.springframework.org/schema/context/spring-context.xsd">
    <context:component-scan base-package="com.mashibing" use-default-filters="false">
        <!--
        当定义好基础扫描的包之后,可以排除包中的某些类,使用如下的方式:
        type:表示指定过滤的规则
            annotation:按照注解进行排除,标注了指定注解的组件不要,expression表示要过滤的注解
            assignable:指定排除某个具体的类,按照类排除,expression表示不注册的具体类名
            aspectj:后面讲aop的时候说明要使用的aspectj表达式,不用
            custom:定义一个typeFilter,自己写代码决定哪些类被过滤掉,不用
            regex:使用正则表达式过滤,不用
        -->
<!--        <context:exclude-filter type="annotation" expression="org.springframework.stereotype.Controller"/>-->

        <!--指定只扫描哪些组件,默认情况下是全部扫描的,所以此时要配置的话需要在component-scan标签中添加 use-default-filters="false"-->
        <context:include-filter type="assignable" expression="com.mashibing.service.PersonService"/>
    </context:component-scan>
</beans>
# 3. 使用@AutoWired进行自动注入
使用注解的方式实现自动注入需要使用@AutoWired注解。
PersonController.java
package com.mashibing.controller;

import com.mashibing.service.PersonService;
import org.springframework.beans.factory.annotation.Autowired;
import org.springframework.stereotype.Controller;

@Controller
public class PersonController {

    @Autowired
    private PersonService personService;

    public PersonController() {
        System.out.println("创建对象");
    }

    public void getPerson(){
        personService.getPerson();
    }
}
PersonService.java
package com.mashibing.service;

import com.mashibing.dao.PersonDao;
import org.springframework.beans.factory.annotation.Autowired;
import org.springframework.stereotype.Service;

@Service
public class PersonService {

    @Autowired
    private PersonDao personDao;

    public void getPerson(){
        personDao.getPerson();
    }
}
PersonDao.java
package com.mashibing.dao;

        import org.springframework.stereotype.Repository;

@Repository
public class PersonDao {

    public void getPerson(){
        System.out.println("PersonDao:getPerson");
    }
}
注意:当使用AutoWired注解的时候,自动装配的时候是根据类型实现的。
1、如果只找到一个,则直接进行赋值,
2、如果没有找到,则直接抛出异常,
3、如果找到多个,那么会按照变量名作为id继续匹配,
1、匹配上直接进行装配
2、如果匹配不上则直接报异常
PersonServiceExt.java
package com.mashibing.service;

import com.mashibing.dao.PersonDao;
import org.springframework.beans.factory.annotation.Autowired;
import org.springframework.stereotype.Service;

@Service
public class PersonServiceExt extends PersonService{

    @Autowired
    private PersonDao personDao;

    public void getPerson(){
        System.out.println("PersonServiceExt......");
        personDao.getPerson();
    }
}
PersonController.java
package com.mashibing.controller;

import com.mashibing.service.PersonService;
import org.springframework.beans.factory.annotation.Autowired;
import org.springframework.stereotype.Controller;

@Controller
public class PersonController {

    @Autowired
    private PersonService personServiceExt;

    public PersonController() {
        System.out.println("创建对象");
    }

    public void getPerson(){
        personServiceExt.getPerson();
    }
}
还可以使用@Qualifier注解来指定id的名称,让spring不要使用变量名,当使用@Qualifier注解的时候也会有两种情况:
1、找到,则直接装配
2、找不到,就会报错
PersonController.java
package com.mashibing.controller;

import com.mashibing.service.PersonService;
import org.springframework.beans.factory.annotation.Autowired;
import org.springframework.beans.factory.annotation.Qualifier;
import org.springframework.stereotype.Controller;

@Controller
public class PersonController {

    @Autowired
    @Qualifier("personService")
    private PersonService personServiceExt2;

    public PersonController() {
        System.out.println("创建对象");
    }

    public void getPerson(){
        personServiceExt2.getPerson();
    }
}
通过上述的代码我们能够发现,使用@AutoWired肯定是能够装配上的,如果装配不上就会报错。
# 4. @AutoWired可以进行定义在方法上
当我们查看@AutoWired注解的源码的时候发现,此注解不仅可以使用在成员变量上,也可以使用在方法上。
PersonController.java
package com.mashibing.controller;

import com.mashibing.dao.PersonDao;
import com.mashibing.service.PersonService;
import org.springframework.beans.factory.annotation.Autowired;
import org.springframework.beans.factory.annotation.Qualifier;
import org.springframework.stereotype.Controller;

@Controller
public class PersonController {

    @Qualifier("personService")
    @Autowired
    private PersonService personServiceExt2;

    public PersonController() {
        System.out.println("创建对象");
    }

    public void getPerson(){
        System.out.println("personController..."+personServiceExt2);
//        personServiceExt2.getPerson();
    }

     /**
     * 当方法上有@AutoWired注解时:
     *  1、此方法在bean创建的时候会自动调用
     *  2、这个方法的每一个参数都会自动注入值
     * @param personDao
     */
    @Autowired
    public void test(PersonDao personDao){
        System.out.println("此方法被调用:"+personDao);
    }

    /**
     * @Qualifier注解也可以作用在属性上,用来被当作id去匹配容器中的对象,如果没有
     * 此注解,那么直接按照类型进行匹配
     * @param personService
     */
    @Autowired
    public void test2(@Qualifier("personServiceExt") PersonService personService){
        System.out.println("此方法被调用:"+personService);
    }
}
# 5. 自动装配的注解@AutoWired,@Resource
在使用自动装配的时候,出了可以使用@AutoWired注解之外,还可以使用@Resource注解,大家需要知道这两个注解的区别。
- @AutoWired:是spring中提供的注解,@Resource:是jdk中定义的注解,依靠的是java的标准
- @AutoWired默认是按照类型进行装配,默认情况下要求依赖的对象必须存在,@Resource默认是按照名字进行匹配的,同时可以指定name属性。
- @AutoWired只适合spring框架,而@Resource扩展性更好
PersonController.java
package com.mashibing.controller;

import com.mashibing.dao.PersonDao;
import com.mashibing.service.PersonService;
import org.springframework.beans.factory.annotation.Autowired;
import org.springframework.beans.factory.annotation.Qualifier;
import org.springframework.stereotype.Controller;

import javax.annotation.Resource;

@Controller
public class PersonController {

    @Qualifier("personService")
    @Resource
    private PersonService personServiceExt2;

    public PersonController() {
        System.out.println("创建对象");
    }

    public void getPerson(){
        System.out.println("personController..."+personServiceExt2);
        personServiceExt2.getPerson();
    }

    /**
     * 当方法上有@AutoWired注解时:
     *  1、此方法在bean创建的时候会自动调用
     *  2、这个方法的每一个参数都会自动注入值
     * @param personDao
     */
    @Autowired
    public void test(PersonDao personDao){
        System.out.println("此方法被调用:"+personDao);
    }

    /**
     * @Qualifier注解也可以作用在属性上,用来被当作id去匹配容器中的对象,如果没有
     * 此注解,那么直接按照类型进行匹配
     * @param personService
     */
    @Autowired
    public void test2(@Qualifier("personServiceExt") PersonService personService){
        System.out.println("此方法被调用:"+personService);
    }
}
# 6. 泛型依赖注入
为了讲解泛型依赖注入,首先我们需要先写一个基本的案例,按照我们之前学习的知识:
Student.java
package com.mashibing.bean;

public class Student {
}
Teacher.java
package com.mashibing.bean;

public class Teacher {
}
BaseDao.java
package com.mashibing.dao;

import org.springframework.stereotype.Repository;

@Repository
public abstract class BaseDao<T> {

    public abstract void save();
}
StudentDao.java
package com.mashibing.dao;

import com.mashibing.bean.Student;
import org.springframework.stereotype.Repository;

@Repository
public class StudentDao extends BaseDao<Student>{
    public void save() {
        System.out.println("保存学生");
    }
}
TeacherDao.java
package com.mashibing.dao;

import com.mashibing.bean.Teacher;
import org.springframework.stereotype.Repository;

@Repository
public class TeacherDao extends BaseDao<Teacher> {
    public void save() {
        System.out.println("保存老师");
    }
}
StudentService.java
package com.mashibing.service;

import com.mashibing.dao.StudentDao;
import org.springframework.beans.factory.annotation.Autowired;
import org.springframework.stereotype.Service;

@Service
public class StudentService {

    @Autowired
    private StudentDao studentDao;

    public void save(){
        studentDao.save();
    }
}
TeacherService.java
package com.mashibing.service;

import com.mashibing.dao.TeacherDao;
import org.springframework.beans.factory.annotation.Autowired;
import org.springframework.stereotype.Service;

@Service
public class TeacherService {
    @Autowired
    private TeacherDao teacherDao;

    public void save(){
        teacherDao.save();
    }
}
MyTest.java
import com.mashibing.service.StudentService;
import com.mashibing.service.TeacherService;
import org.springframework.context.ApplicationContext;
import org.springframework.context.support.ClassPathXmlApplicationContext;

import javax.sql.DataSource;
import java.sql.SQLException;

public class MyTest {
    public static void main(String[] args) throws SQLException {
        ApplicationContext context = new ClassPathXmlApplicationContext("applicationContext.xml");
        StudentService studentService = context.getBean("studentService",StudentService.class);
        studentService.save();

        TeacherService teacherService = context.getBean("teacherService",TeacherService.class);
        teacherService.save();
    }
}
上述代码是我们之前的可以完成的功能,但是可以思考,Service层的代码是否能够改写:
BaseService.java
package com.mashibing.service;

import com.mashibing.dao.BaseDao;
import org.springframework.beans.factory.annotation.Autowired;
import org.springframework.stereotype.Service;

public class BaseService<T> {

    @Autowired
    BaseDao<T> baseDao;

    public void save(){
        System.out.println("自动注入的对象:"+baseDao);
        baseDao.save();
    }
}
StudentService.java
package com.mashibing.service;

import com.mashibing.bean.Student;
import com.mashibing.dao.StudentDao;
import org.springframework.beans.factory.annotation.Autowired;
import org.springframework.stereotype.Service;

@Service
public class StudentService extends BaseService<Student> {

}
TeacherService.java
package com.mashibing.service;

import com.mashibing.bean.Teacher;
import com.mashibing.dao.TeacherDao;
import org.springframework.beans.factory.annotation.Autowired;
import org.springframework.stereotype.Service;

@Service
public class TeacherService extends BaseService<Teacher>{

}
# 7. 总结:@Autowired 的区别 @Resource
- @Autowired 优先按照 @Qualifier 指定的名称进行装配,在没有指定 @Qualifier 的时候,默认按照类的名称进行装配,然后再按照属性名称进行装配。
- @Resource 先按照属性名称进行装配,然后如果存在 @Qualifier 指定的名称,则按照 @Qualifier 指定的名称进行装配,如果不存在 @Qualifier 再按照类的名称进行装配。
- @Resource 因为是先按照名称匹配,再按照类名匹配,所以会存在一个问题:名称如果匹配成功,然而类名和名称对应的类不是同一个的时候,会报错。
# Spring AOP介绍与使用
- AOP:Aspect Oriented Programming 面向切面编程
- OOP:Object Oriented Programming 面向对象编程
面向切面编程:基于OOP基础之上新的编程思想,OOP面向的主要对象是类,而AOP面向的主要对象是切面,在处理日志、安全管理、事务管理等方面有非常重要的作用。AOP是Spring中重要的核心点,虽然IOC容器没有依赖AOP,但是AOP提供了非常强大的功能,用来对IOC做补充。通俗点说的话就是在程序运行期间,将某段代码动态切入到指定方法的指定位置进行运行的这种编程方式。
# AOP的概念
# 为什么要引入AOP?
Calculator.java
package com.mashibing.inter;

public interface Calculator {

    public int add(int i,int j);

    public int sub(int i,int j);

    public int mult(int i,int j);

    public int div(int i,int j);
}
MyCalculator.java
package com.mashibing.inter;

public class MyCalculator implements Calculator {
    public int add(int i, int j) {
        int result = i + j;
        return result;
    }

    public int sub(int i, int j) {
        int result = i - j;
        return result;
    }

    public int mult(int i, int j) {
        int result = i * j;
        return result;
    }

    public int div(int i, int j) {
        int result = i / j;
        return result;
    }
}
MyTest.java
public class MyTest {
    public static void main(String[] args) throws SQLException {
        MyCalculator myCalculator = new MyCalculator();
        System.out.println(myCalculator.add(1, 2));
    }
}
此代码非常简单,就是基础的javase的代码实现,此时如果需要添加日志功能应该怎么做呢,只能在每个方法中添加日志输出,同时如果需要修改的话会变得非常麻烦。
MyCalculator.java
package com.mashibing.inter;

public class MyCalculator implements Calculator {
    public int add(int i, int j) {
        System.out.println("add 方法开始执行,参数为:"+i+","+j);
        int result = i + j;
        System.out.println("add 方法开始完成结果为:"+result);
        return result;
    }

    public int sub(int i, int j) {
        System.out.println("sub 方法开始执行,参数为:"+i+","+j);
        int result = i - j;
        System.out.println("add 方法开始完成结果为:"+result);
        return result;
    }

    public int mult(int i, int j) {
        System.out.println("mult 方法开始执行,参数为:"+i+","+j);
        int result = i * j;
        System.out.println("add 方法开始完成结果为:"+result);
        return result;
    }

    public int div(int i, int j) {
        System.out.println("div 方法开始执行,参数为:"+i+","+j);
        int result = i / j;
        System.out.println("add 方法开始完成结果为:"+result);
        return result;
    }
}
可以考虑将日志的处理抽象出来,变成工具类来进行实现:
LogUtil.java
package com.mashibing.util;

import java.util.Arrays;

public class LogUtil {

    public static void start(Object ... objects){
        System.out.println("XXX方法开始执行,使用的参数是:"+ Arrays.asList(objects));
    }

    public static void stop(Object ... objects){
        System.out.println("XXX方法执行结束,结果是:"+ Arrays.asList(objects));
    }
}
MyCalculator.java
package com.mashibing.inter;

import com.mashibing.util.LogUtil;

public class MyCalculator implements Calculator {
    public int add(int i, int j) {
        LogUtil.start(i,j);
        int result = i + j;
        LogUtil.stop(result);
        return result;
    }

    public int sub(int i, int j) {
        LogUtil.start(i,j);
        int result = i - j;
        LogUtil.stop(result);
        return result;
    }

    public int mult(int i, int j) {
        LogUtil.start(i,j);
        int result = i * j;
        LogUtil.stop(result);
        return result;
    }

    public int div(int i, int j) {
        LogUtil.start(i,j);
        int result = i / j;
        LogUtil.stop(result);
        return result;
    }
}
按照上述方式抽象之后,代码确实简单很多,但是大家应该已经发现在输出的信息中并不包含具体的方法名称,我们更多的是想要在程序运行过程中动态的获取方法的名称及参数、结果等相关信息,此时可以通过使用动态代理的方式来进行实现。
CalculatorProxy.java
package com.mashibing.proxy;

import com.mashibing.inter.Calculator;

import java.lang.reflect.InvocationHandler;
import java.lang.reflect.InvocationTargetException;
import java.lang.reflect.Method;
import java.lang.reflect.Proxy;
import java.util.Arrays;

/**
 * 帮助Calculator生成代理对象的类
 */
public class CalculatorProxy {

    /**
     *
     *  为传入的参数对象创建一个动态代理对象
     * @param calculator 被代理对象
     * @return
     */
    public static Calculator getProxy(final Calculator calculator){


        //被代理对象的类加载器
        ClassLoader loader = calculator.getClass().getClassLoader();
        //被代理对象的接口
        Class<?>[] interfaces = calculator.getClass().getInterfaces();
        //方法执行器,执行被代理对象的目标方法
        InvocationHandler h = new InvocationHandler() {
            /**
             *  执行目标方法
             * @param proxy 代理对象,给jdk使用,任何时候都不要操作此对象
             * @param method 当前将要执行的目标对象的方法
             * @param args 这个方法调用时外界传入的参数值
             * @return
             * @throws Throwable
             */
            public Object invoke(Object proxy, Method method, Object[] args) throws Throwable {
                //利用反射执行目标方法,目标方法执行后的返回值
//                System.out.println("这是动态代理执行的方法");
                Object result = null;
                try {
                    System.out.println(method.getName()+"方法开始执行,参数是:"+ Arrays.asList(args));
                    result = method.invoke(calculator, args);
                    System.out.println(method.getName()+"方法执行完成,结果是:"+ result);
                } catch (Exception e) {
                    System.out.println(method.getName()+"方法出现异常:"+ e.getMessage());
                } finally {
                    System.out.println(method.getName()+"方法执行结束了......");
                }
                //将结果返回回去
                return result;
            }
        };
        Object proxy = Proxy.newProxyInstance(loader, interfaces, h);
        return (Calculator) proxy;
    }
}
我们可以看到这种方式更加灵活,而且不需要在业务方法中添加额外的代码,这才是常用的方式。如果想追求完美的同学,还可以使用上述的日志工具类来完善。
LogUtil.java
package com.mashibing.util;

import java.lang.reflect.Method;
import java.util.Arrays;

public class LogUtil {

    public static void start(Method method, Object ... objects){
//        System.out.println("XXX方法开始执行,使用的参数是:"+ Arrays.asList(objects));
        System.out.println(method.getName()+"方法开始执行,参数是:"+ Arrays.asList(objects));
    }

    public static void stop(Method method,Object ... objects){
//        System.out.println("XXX方法执行结束,结果是:"+ Arrays.asList(objects));
        System.out.println(method.getName()+"方法开始执行,参数是:"+ Arrays.asList(objects));

    }

    public static void logException(Method method,Exception e){
        System.out.println(method.getName()+"方法出现异常:"+ e.getMessage());
    }

    public static void end(Method method){
        System.out.println(method.getName()+"方法执行结束了......");
    }
}
CalculatorProxy.java
package com.mashibing.proxy;

import com.mashibing.inter.Calculator;
import com.mashibing.util.LogUtil;

import java.lang.reflect.InvocationHandler;
import java.lang.reflect.InvocationTargetException;
import java.lang.reflect.Method;
import java.lang.reflect.Proxy;
import java.util.Arrays;

/**
 * 帮助Calculator生成代理对象的类
 */
public class CalculatorProxy {

    /**
     *
     *  为传入的参数对象创建一个动态代理对象
     * @param calculator 被代理对象
     * @return
     */
    public static Calculator getProxy(final Calculator calculator){


        //被代理对象的类加载器
        ClassLoader loader = calculator.getClass().getClassLoader();
        //被代理对象的接口
        Class<?>[] interfaces = calculator.getClass().getInterfaces();
        //方法执行器,执行被代理对象的目标方法
        InvocationHandler h = new InvocationHandler() {
            /**
             *  执行目标方法
             * @param proxy 代理对象,给jdk使用,任何时候都不要操作此对象
             * @param method 当前将要执行的目标对象的方法
             * @param args 这个方法调用时外界传入的参数值
             * @return
             * @throws Throwable
             */
            public Object invoke(Object proxy, Method method, Object[] args) throws Throwable {
                //利用反射执行目标方法,目标方法执行后的返回值
//                System.out.println("这是动态代理执行的方法");
                Object result = null;
                try {
                    LogUtil.start(method,args);
                    result = method.invoke(calculator, args);
                    LogUtil.stop(method,args);
                } catch (Exception e) {
                    LogUtil.logException(method,e);
                } finally {
                    LogUtil.end(method);
                }
                //将结果返回回去
                return result;
            }
        };
        Object proxy = Proxy.newProxyInstance(loader, interfaces, h);
        return (Calculator) proxy;
    }
}
很多同学看到上述代码之后可能感觉已经非常完美了,但是要说明的是,这种动态代理的实现方式调用的是jdk的基本实现,如果需要代理的目标对象没有实现任何接口,那么是无法为他创建代理对象的,这也是致命的缺陷。而在Spring中我们可以不编写上述如此复杂的代码,只需要利用AOP,就能够轻轻松松实现上述功能,当然,Spring AOP的底层实现也依赖的是动态代理。
# AOP的核心概念及术语
- 切面(Aspect): 指关注点模块化,这个关注点可能会横切多个对象。事务管理是企业级Java应用中有关横切关注点的例子。 在Spring AOP中,切面可以使用通用类基于模式的方式(schema-based approach)或者在普通类中以
@Aspect注解(@AspectJ 注解方式)来实现。 - 连接点(Join point): 在程序执行过程中某个特定的点,例如某个方法调用的时间点或者处理异常的时间点。在Spring AOP中,一个连接点总是代表一个方法的执行。
- 通知(Advice): 在切面的某个特定的连接点上执行的动作。通知有多种类型,包括“around”, “before” and “after”等等。通知的类型将在后面的章节进行讨论。 许多AOP框架,包括Spring在内,都是以拦截器做通知模型的,并维护着一个以连接点为中心的拦截器链。
- 切点(Pointcut): 匹配连接点的断言。通知和切点表达式相关联,并在满足这个切点的连接点上运行(例如,当执行某个特定名称的方法时)。切点表达式如何和连接点匹配是AOP的核心:Spring默认使用AspectJ切点语义。
- 引入(Introduction): 声明额外的方法或者某个类型的字段。Spring允许引入新的接口(以及一个对应的实现)到任何被通知的对象上。例如,可以使用引入来使bean实现
IsModified接口, 以便简化缓存机制(在AspectJ社区,引入也被称为内部类型声明(inter))。 - 目标对象(Target object): 被一个或者多个切面所通知的对象。也被称作被通知(advised)对象。既然Spring AOP是通过运行时代理实现的,那么这个对象永远是一个被代理(proxied)的对象。
- AOP代理(AOP proxy):AOP框架创建的对象,用来实现切面契约(aspect contract)(包括通知方法执行等功能)。在Spring中,AOP代理可以是JDK动态代理或CGLIB代理。
- 织入(Weaving): 把切面连接到其它的应用程序类型或者对象上,并创建一个被被通知的对象的过程。这个过程可以在编译时(例如使用AspectJ编译器)、类加载时或运行时中完成。 Spring和其他纯Java AOP框架一样,是在运行时完成织入的。
# AOP的通知类型
- 前置通知(Before advice): 在连接点之前运行但无法阻止执行流程进入连接点的通知(除非它引发异常)。
- 后置返回通知(After returning advice):在连接点正常完成后执行的通知(例如,当方法没有抛出任何异常并正常返回时)。
- 后置异常通知(After throwing advice): 在方法抛出异常退出时执行的通知。
- 后置通知(总会执行)(After (finally) advice): 当连接点退出的时候执行的通知(无论是正常返回还是异常退出)。
- 环绕通知(Around Advice):环绕连接点的通知,例如方法调用。这是最强大的一种通知类型,。环绕通知可以在方法调用前后完成自定义的行为。它可以选择是否继续执行连接点或直接返回自定义的返回值又或抛出异常将执行结束。
# AOP的应用场景
- 日志管理
- 权限认证
- 安全检查
- 事务控制
# Spring AOP的简单配置
在上述代码中我们是通过动态代理的方式实现日志功能的,但是比较麻烦,现在我们将要使用spring aop的功能实现此需求,其实通俗点说的话,就是把LogUtil的工具类换成另外一种实现方式。
# 1. 添加pom依赖
<!-- https://mvnrepository.com/artifact/cglib/cglib -->
<dependency>
    <groupId>cglib</groupId>
    <artifactId>cglib</artifactId>
    <version>3.3.0</version>
</dependency>
<!-- https://mvnrepository.com/artifact/org.aspectj/aspectjweaver -->
<dependency>
    <groupId>org.aspectj</groupId>
    <artifactId>aspectjweaver</artifactId>
    <version>1.9.5</version>
</dependency>
<!-- https://mvnrepository.com/artifact/aopalliance/aopalliance -->
<dependency>
    <groupId>aopalliance</groupId>
    <artifactId>aopalliance</artifactId>
    <version>1.0</version>
</dependency>
<!-- https://mvnrepository.com/artifact/org.springframework/spring-aspects -->
<dependency>
    <groupId>org.springframework</groupId>
    <artifactId>spring-aspects</artifactId>
    <version>5.2.3.RELEASE</version>
</dependency>
# 2. 编写配置
将目标类和切面类加入到IOC容器中,在对应的类上添加组件注解
给LogUtil添加@Component注解
给MyCalculator添加@Service注解
添加自动扫描的配置
<!--别忘了添加context命名空间-->
<context:component-scan base-package="com.mashibing"></context:component-scan>
设置程序中的切面类
- 在LogUtil.java中添加@Aspect注解
设置切面类中的方法是什么时候在哪里执行
package com.mashibing.util;

import org.aspectj.lang.annotation.*;
import org.springframework.stereotype.Component;

import java.lang.reflect.Method;
import java.util.Arrays;

@Component
@Aspect
public class LogUtil {

    /*
    设置下面方法在什么时候运行
        @Before:在目标方法之前运行:前置通知
        @After:在目标方法之后运行:后置通知
        @AfterReturning:在目标方法正常返回之后:返回通知
        @AfterThrowing:在目标方法抛出异常后开始运行:异常通知
        @Around:环绕:环绕通知

        当编写完注解之后还需要设置在哪些方法上执行,使用表达式
        execution(访问修饰符  返回值类型 方法全称)
     */
    @Before("execution( public int com.mashibing.inter.MyCalculator.*(int,int))")
    public static void start(){
//        System.out.println("XXX方法开始执行,使用的参数是:"+ Arrays.asList(objects));
//        System.out.println(method.getName()+"方法开始执行,参数是:"+ Arrays.asList(objects));
        System.out.println("方法开始执行,参数是:");
    }

    @AfterReturning("execution( public int com.mashibing.inter.MyCalculator.*(int,int))")
    public static void stop(){
//        System.out.println("XXX方法执行结束,结果是:"+ Arrays.asList(objects));
//        System.out.println(method.getName()+"方法执行结束,结果是:"+ Arrays.asList(objects));
        System.out.println("方法执行完成,结果是:");

    }

    @AfterThrowing("execution( public int com.mashibing.inter.MyCalculator.*(int,int))")
    public static void logException(){
//        System.out.println(method.getName()+"方法出现异常:"+ e.getMessage());
        System.out.println("方法出现异常:");
    }

    @After("execution( public int com.mashibing.inter.MyCalculator.*(int,int))")
    public static void end(){
//        System.out.println(method.getName()+"方法执行结束了......");
        System.out.println("方法执行结束了......");
    }
}
开启基于注解的aop的功能
<?xml version="1.0" encoding="UTF-8"?>
<beans xmlns="http://www.springframework.org/schema/beans"
       xmlns:xsi="http://www.w3.org/2001/XMLSchema-instance"
       xmlns:context="http://www.springframework.org/schema/context"
       xmlns:aop="http://www.springframework.org/schema/aop"
       xsi:schemaLocation="http://www.springframework.org/schema/beans
       http://www.springframework.org/schema/beans/spring-beans.xsd
       http://www.springframework.org/schema/context
       http://www.springframework.org/schema/context/spring-context.xsd
       http://www.springframework.org/schema/aop
       https://www.springframework.org/schema/aop/spring-aop.xsd
">
    <context:component-scan base-package="com.mashibing"></context:component-scan>
    <aop:aspectj-autoproxy></aop:aspectj-autoproxy>
</beans>
# 3. 测试
MyTest.java
import com.mashibing.inter.Calculator;
import org.springframework.context.ApplicationContext;
import org.springframework.context.support.ClassPathXmlApplicationContext;
public class MyTest {
    public static void main(String[] args){
        ApplicationContext context = new ClassPathXmlApplicationContext("aop.xml");
        Calculator bean = context.getBean(Calculator.class);
        bean.add(1,1);
    }
}
spring AOP的动态代理方式是jdk自带的方式,容器中保存的组件是代理对象com.sun.proxy.$Proxy对象
# 4. 通过cglib来创建代理对象
MyCalculator.java
package com.mashibing.inter;

import org.springframework.stereotype.Service;

@Service
public class MyCalculator {
    public int add(int i, int j) {
        int result = i + j;
        return result;
    }

    public int sub(int i, int j) {
        int result = i - j;
        return result;
    }

    public int mult(int i, int j) {
        int result = i * j;
        return result;
    }

    public int div(int i, int j) {
        int result = i / j;
        return result;
    }
}
MyTest.java
public class MyTest {
    public static void main(String[] args){
        ApplicationContext context = new ClassPathXmlApplicationContext("aop.xml");
        MyCalculator bean = context.getBean(MyCalculator.class);
        bean.add(1,1);
        System.out.println(bean);
        System.out.println(bean.getClass());
    }
}
可以通过cglib的方式来创建代理对象,此时不需要实现任何接口,代理对象是
class com.mashibing.inter.MyCalculator$$EnhancerBySpringCGLIB$$1f93b605
综上所述:在spring容器中,如果有接口,那么会使用jdk自带的动态代理,如果没有接口,那么会使用cglib的动态代理。动态代理的实现原理,后续会详细讲。
# 5. 注意
# 1. 切入点表达式
在使用表达式的时候,除了之前的写法之外,还可以使用通配符的方式:
*:
1、匹配一个或者多个字符
execution( public int com.mashibing.inter.My*alculator.*(int,int))
2、匹配任意一个参数,
execution( public int com.mashibing.inter.MyCalculator.*(int,*))
3、只能匹配一层路径,如果项目路径下有多层目录,那么*只能匹配一层路径
4、权限位置不能使用*,如果想表示全部权限,那么不写即可
execution( * com.mashibing.inter.MyCalculator.*(int,*))
..:
1、匹配多个参数,任意类型参数
execution( * com.mashibing.inter.MyCalculator.*(..))
2、匹配任意多层路径
execution( * com.mashibing..MyCalculator.*(..))
在写表达式的时候,可以有N多种写法,但是有一种最偷懒和最精确的方式:
最偷懒的方式:execution(* *(..)) 或者 execution(* *.*(..))
最精确的方式:execution( public int com.mashibing.inter.MyCalculator.add(int,int))
除此之外,在表达式中还支持 &&、||、!的方式
&&:两个表达式同时
execution( public int com.mashibing.inter.MyCalculator.*(..)) && execution(* *.*(int,int) )
||:任意满足一个表达式即可
execution( public int com.mashibing.inter.MyCalculator.*(..)) && execution(* *.*(int,int) )
!:只要不是这个位置都可以进行切入
&&:两个表达式同时
execution( public int com.mashibing.inter.MyCalculator.*(..))
# 2. 通知方法的执行顺序
在之前的代码中大家一直对通知的执行顺序有疑问,其实执行的结果并没有错,大家需要注意:
1、正常执行:@Before--->@After--->@AfterReturning
2、异常执行:@Before--->@After--->@AfterThrowing
# 3. 获取方法的详细信息
在上面的案例中,我们并没有获取Method的详细信息,例如方法名、参数列表等信息,想要获取的话其实非常简单,只需要添加JoinPoint参数即可。
LogUtil.java
package com.mashibing.util;

import org.aspectj.lang.JoinPoint;
import org.aspectj.lang.annotation.*;
import org.springframework.stereotype.Component;

import java.util.Arrays;

@Component
@Aspect
public class LogUtil {

    @Before("execution( public int com.mashibing.inter.MyCalculator.*(int,int))")
    public static void start(JoinPoint joinPoint){
        Object[] args = joinPoint.getArgs();
        String name = joinPoint.getSignature().getName();
        System.out.println(name+"方法开始执行,参数是:"+ Arrays.asList(args));
    }

    @AfterReturning("execution( public int com.mashibing.inter.MyCalculator.*(int,int))")
    public static void stop(JoinPoint joinPoint){
        String name = joinPoint.getSignature().getName();
        System.out.println(name+"方法执行完成,结果是:");

    }

    @AfterThrowing("execution( public int com.mashibing.inter.MyCalculator.*(int,int))")
    public static void logException(JoinPoint joinPoint){
        String name = joinPoint.getSignature().getName();
        System.out.println(name+"方法出现异常:");
    }

    @After("execution( public int com.mashibing.inter.MyCalculator.*(int,int))")
    public static void end(JoinPoint joinPoint){
        String name = joinPoint.getSignature().getName();
        System.out.println(name+"方法执行结束了......");
    }
}
刚刚只是获取了方法的信息,但是如果需要获取结果,还需要添加另外一个方法参数,并且告诉spring使用哪个参数来进行结果接收
LogUtil.java
    @AfterReturning(value = "execution( public int com.mashibing.inter.MyCalculator.*(int,int))",returning = "result")
    public static void stop(JoinPoint joinPoint,Object result){
        String name = joinPoint.getSignature().getName();
        System.out.println(name+"方法执行完成,结果是:"+result);

    }
也可以通过相同的方式来获取异常的信息
LogUtil.java
    @AfterThrowing(value = "execution( public int com.mashibing.inter.MyCalculator.*(int,int))",throwing = "exception")
    public static void logException(JoinPoint joinPoint,Exception exception){
        String name = joinPoint.getSignature().getName();
        System.out.println(name+"方法出现异常:"+exception);
    }
# 4. spring对通过方法的要求
spring对于通知方法的要求并不是很高,你可以任意改变方法的返回值和方法的访问修饰符,但是唯一不能修改的就是方法的参数,会出现参数绑定的错误,原因在于通知方法是spring利用反射调用的,每次方法调用得确定这个方法的参数的值。
LogUtil.java
    @After("execution( public int com.mashibing.inter.MyCalculator.*(int,int))")
    private int end(JoinPoint joinPoint,String aa){
//        System.out.println(method.getName()+"方法执行结束了......");
        String name = joinPoint.getSignature().getName();
        System.out.println(name+"方法执行结束了......");
        return 0;
    }
# 5. 表达式的抽取
如果在实际使用过程中,多个方法的表达式是一致的话,那么可以考虑将切入点表达式抽取出来:
a、随便生命一个没有实现的返回void的空方法
b、给方法上标注@Potintcut注解
package com.mashibing.util;

import org.aspectj.lang.JoinPoint;
import org.aspectj.lang.annotation.*;
import org.springframework.stereotype.Component;

import java.util.Arrays;

@Component
@Aspect
public class LogUtil {

    @Pointcut("execution( public int com.mashibing.inter.MyCalculator.*(int,int))")
    public void myPoint(){}

    @Before("myPoint()")
    public static void start(JoinPoint joinPoint){
        Object[] args = joinPoint.getArgs();
        String name = joinPoint.getSignature().getName();
        System.out.println(name+"方法开始执行,参数是:"+ Arrays.asList(args));
    }

    @AfterReturning(value = "myPoint()",returning = "result")
    public static void stop(JoinPoint joinPoint,Object result){
        String name = joinPoint.getSignature().getName();
        System.out.println(name+"方法执行完成,结果是:"+result);

    }

    @AfterThrowing(value = "myPoint()",throwing = "exception")
    public static void logException(JoinPoint joinPoint,Exception exception){
        String name = joinPoint.getSignature().getName();
        System.out.println(name+"方法出现异常:"+exception.getMessage());
    }

    @After("myPoint()")
    private int end(JoinPoint joinPoint){
        String name = joinPoint.getSignature().getName();
        System.out.println(name+"方法执行结束了......");
        return 0;
    }
}
# 6. 环绕通知的使用
LogUtil.java
package com.mashibing.util;

import org.aspectj.lang.JoinPoint;
import org.aspectj.lang.ProceedingJoinPoint;
import org.aspectj.lang.annotation.*;
import org.springframework.stereotype.Component;

import java.util.Arrays;

@Component
@Aspect
public class LogUtil {
    @Pointcut("execution( public int com.mashibing.inter.MyCalculator.*(int,int))")
    public void myPoint(){}

    /**
     * 环绕通知是spring中功能最强大的通知
     * @param proceedingJoinPoint
     * @return
     */
    @Around("myPoint()")
    public Object myAround(ProceedingJoinPoint proceedingJoinPoint){
        Object[] args = proceedingJoinPoint.getArgs();
        String name = proceedingJoinPoint.getSignature().getName();
        Object proceed = null;
        try {
            System.out.println("环绕前置通知:"+name+"方法开始,参数是"+Arrays.asList(args));
            //利用反射调用目标方法,就是method.invoke()
            proceed = proceedingJoinPoint.proceed(args);
            System.out.println("环绕返回通知:"+name+"方法返回,返回值是"+proceed);
        } catch (Throwable e) {
            System.out.println("环绕异常通知"+name+"方法出现异常,异常信息是:"+e);
        }finally {
            System.out.println("环绕后置通知"+name+"方法结束");
        }
        return proceed;
    }
}
总结:环绕通知的执行顺序是优于普通通知的,具体的执行顺序如下:
环绕前置-->普通前置-->目标方法执行-->环绕正常结束/出现异常-->环绕后置-->普通后置-->普通返回或者异常。
但是需要注意的是,如果出现了异常,那么环绕通知会处理或者捕获异常,普通异常通知是接收不到的,因此最好的方式是在环绕异常通知中向外抛出异常。
# 7. 多切面运行的顺序
如果有多个切面要进行执行,那么顺序是什么样的呢?
LogUtil.java
package com.mashibing.util;

import org.aspectj.lang.JoinPoint;
import org.aspectj.lang.ProceedingJoinPoint;
import org.aspectj.lang.annotation.*;
import org.springframework.stereotype.Component;

import java.util.Arrays;

@Component
@Aspect
public class LogUtil {
    @Pointcut("execution( public int com.mashibing.inter.MyCalculator.*(int,int))")
    public void myPoint(){}
    @Before("myPoint()")
    public static void start(JoinPoint joinPoint){
//        System.out.println("XXX方法开始执行,使用的参数是:"+ Arrays.asList(objects));
//        System.out.println(method.getName()+"方法开始执行,参数是:"+ Arrays.asList(objects));
        Object[] args = joinPoint.getArgs();
        String name = joinPoint.getSignature().getName();
        System.out.println("Log:"+name+"方法开始执行,参数是:"+ Arrays.asList(args));
    }

    @AfterReturning(value = "myPoint()",returning = "result")
    public static void stop(JoinPoint joinPoint,Object result){
//        System.out.println("XXX方法执行结束,结果是:"+ Arrays.asList(objects));
//        System.out.println(method.getName()+"方法执行结束,结果是:"+ Arrays.asList(objects));
        String name = joinPoint.getSignature().getName();
        System.out.println("Log:"+name+"方法执行完成,结果是:"+result);

    }

    @AfterThrowing(value = "myPoint()",throwing = "exception")
    public static void logException(JoinPoint joinPoint,Exception exception){
//        System.out.println(method.getName()+"方法出现异常:"+ e.getMessage());
        String name = joinPoint.getSignature().getName();
        System.out.println("Log:"+name+"方法出现异常:"+exception.getMessage());
    }

    @After("myPoint()")
    private int end(JoinPoint joinPoint){
//        System.out.println(method.getName()+"方法执行结束了......");
        String name = joinPoint.getSignature().getName();
        System.out.println("Log:"+name+"方法执行结束了......");
        return 0;
    }

    /**
     * 环绕通知是spring中功能最强大的通知
     * @param proceedingJoinPoint
     * @return
     */
    //@Around("myPoint()")
    public Object myAround(ProceedingJoinPoint proceedingJoinPoint){
        Object[] args = proceedingJoinPoint.getArgs();
        String name = proceedingJoinPoint.getSignature().getName();
        Object proceed = null;
        try {
            System.out.println("环绕前置通知:"+name+"方法开始,参数是"+Arrays.asList(args));
            //利用反射调用目标方法,就是method.invoke()
            proceed = proceedingJoinPoint.proceed(args);
            System.out.println("环绕返回通知:"+name+"方法返回,返回值是"+proceed);
        } catch (Throwable e) {
            System.out.println("环绕异常通知"+name+"方法出现异常,异常信息是:"+e);
        }finally {
            System.out.println("环绕后置通知"+name+"方法结束");
        }
        return proceed;
    }
}
SecurityAspect.java
package com.mashibing.util;

import org.aspectj.lang.JoinPoint;
import org.aspectj.lang.ProceedingJoinPoint;
import org.aspectj.lang.annotation.*;
import org.springframework.stereotype.Component;

import java.util.Arrays;

@Component
@Aspect
public class SecurityAspect {

    @Before("com.mashibing.util.LogUtil.myPoint()")
    public static void start(JoinPoint joinPoint){
        Object[] args = joinPoint.getArgs();
        String name = joinPoint.getSignature().getName();
        System.out.println("Security:"+name+"方法开始执行,参数是:"+ Arrays.asList(args));
    }

    @AfterReturning(value = "com.mashibing.util.LogUtil.myPoint()",returning = "result")
    public static void stop(JoinPoint joinPoint,Object result){
        String name = joinPoint.getSignature().getName();
        System.out.println("Security:"+name+"方法执行完成,结果是:"+result);

    }

    @AfterThrowing(value = "com.mashibing.util.LogUtil.myPoint()",throwing = "exception")
    public static void logException(JoinPoint joinPoint,Exception exception){
        String name = joinPoint.getSignature().getName();
        System.out.println("Security:"+name+"方法出现异常:"+exception.getMessage());
    }

    @After("com.mashibing.util.LogUtil.myPoint()")
    private int end(JoinPoint joinPoint){
        String name = joinPoint.getSignature().getName();
        System.out.println("Security:"+name+"方法执行结束了......");
        return 0;
    }

    /**
     * 环绕通知是spring中功能最强大的通知
     * @param proceedingJoinPoint
     * @return
     */
    //@Around("myPoint()")
    public Object myAround(ProceedingJoinPoint proceedingJoinPoint){
        Object[] args = proceedingJoinPoint.getArgs();
        String name = proceedingJoinPoint.getSignature().getName();
        Object proceed = null;
        try {
            System.out.println("环绕前置通知:"+name+"方法开始,参数是"+Arrays.asList(args));
            //利用反射调用目标方法,就是method.invoke()
            proceed = proceedingJoinPoint.proceed(args);
            System.out.println("环绕返回通知:"+name+"方法返回,返回值是"+proceed);
        } catch (Throwable e) {
            System.out.println("环绕异常通知"+name+"方法出现异常,异常信息是:"+e);
        }finally {
            System.out.println("环绕后置通知"+name+"方法结束");
        }
        return proceed;
    }
}
在spring中,默认是按照切面名称的字典顺序进行执行的,但是如果想自己改变具体的执行顺序的话,可以使用@Order注解来解决,数值越小,优先级越高。
LogUtil.java
package com.mashibing.util;

import org.aspectj.lang.JoinPoint;
import org.aspectj.lang.ProceedingJoinPoint;
import org.aspectj.lang.annotation.*;
import org.springframework.stereotype.Component;

import java.util.Arrays;

@Component
@Aspect
@Order(2)
public class LogUtil {
    @Pointcut("execution( public int com.mashibing.inter.MyCalculator.*(int,int))")
    public void myPoint(){}
    @Before("myPoint()")
    public static void start(JoinPoint joinPoint){
//        System.out.println("XXX方法开始执行,使用的参数是:"+ Arrays.asList(objects));
//        System.out.println(method.getName()+"方法开始执行,参数是:"+ Arrays.asList(objects));
        Object[] args = joinPoint.getArgs();
        String name = joinPoint.getSignature().getName();
        System.out.println("Log:"+name+"方法开始执行,参数是:"+ Arrays.asList(args));
    }

    @AfterReturning(value = "myPoint()",returning = "result")
    public static void stop(JoinPoint joinPoint,Object result){
//        System.out.println("XXX方法执行结束,结果是:"+ Arrays.asList(objects));
//        System.out.println(method.getName()+"方法执行结束,结果是:"+ Arrays.asList(objects));
        String name = joinPoint.getSignature().getName();
        System.out.println("Log:"+name+"方法执行完成,结果是:"+result);

    }

    @AfterThrowing(value = "myPoint()",throwing = "exception")
    public static void logException(JoinPoint joinPoint,Exception exception){
//        System.out.println(method.getName()+"方法出现异常:"+ e.getMessage());
        String name = joinPoint.getSignature().getName();
        System.out.println("Log:"+name+"方法出现异常:"+exception.getMessage());
    }

    @After("myPoint()")
    private int end(JoinPoint joinPoint){
//        System.out.println(method.getName()+"方法执行结束了......");
        String name = joinPoint.getSignature().getName();
        System.out.println("Log:"+name+"方法执行结束了......");
        return 0;
    }

    /**
     * 环绕通知是spring中功能最强大的通知
     * @param proceedingJoinPoint
     * @return
     */
    //@Around("myPoint()")
    public Object myAround(ProceedingJoinPoint proceedingJoinPoint){
        Object[] args = proceedingJoinPoint.getArgs();
        String name = proceedingJoinPoint.getSignature().getName();
        Object proceed = null;
        try {
            System.out.println("环绕前置通知:"+name+"方法开始,参数是"+Arrays.asList(args));
            //利用反射调用目标方法,就是method.invoke()
            proceed = proceedingJoinPoint.proceed(args);
            System.out.println("环绕返回通知:"+name+"方法返回,返回值是"+proceed);
        } catch (Throwable e) {
            System.out.println("环绕异常通知"+name+"方法出现异常,异常信息是:"+e);
        }finally {
            System.out.println("环绕后置通知"+name+"方法结束");
        }
        return proceed;
    }
}
SecurityAspect.java
package com.mashibing.util;

import org.aspectj.lang.JoinPoint;
import org.aspectj.lang.ProceedingJoinPoint;
import org.aspectj.lang.annotation.*;
import org.springframework.stereotype.Component;

import java.util.Arrays;

@Component
@Aspect
@Order(1)
public class SecurityAspect {

    @Before("com.mashibing.util.LogUtil.myPoint()")
    public static void start(JoinPoint joinPoint){
        Object[] args = joinPoint.getArgs();
        String name = joinPoint.getSignature().getName();
        System.out.println("Security:"+name+"方法开始执行,参数是:"+ Arrays.asList(args));
    }

    @AfterReturning(value = "com.mashibing.util.LogUtil.myPoint()",returning = "result")
    public static void stop(JoinPoint joinPoint,Object result){
        String name = joinPoint.getSignature().getName();
        System.out.println("Security:"+name+"方法执行完成,结果是:"+result);

    }

    @AfterThrowing(value = "com.mashibing.util.LogUtil.myPoint()",throwing = "exception")
    public static void logException(JoinPoint joinPoint,Exception exception){
        String name = joinPoint.getSignature().getName();
        System.out.println("Security:"+name+"方法出现异常:"+exception.getMessage());
    }

    @After("com.mashibing.util.LogUtil.myPoint()")
    private int end(JoinPoint joinPoint){
        String name = joinPoint.getSignature().getName();
        System.out.println("Security:"+name+"方法执行结束了......");
        return 0;
    }

    /**
     * 环绕通知是spring中功能最强大的通知
     * @param proceedingJoinPoint
     * @return
     */
    //@Around("myPoint()")
    public Object myAround(ProceedingJoinPoint proceedingJoinPoint){
        Object[] args = proceedingJoinPoint.getArgs();
        String name = proceedingJoinPoint.getSignature().getName();
        Object proceed = null;
        try {
            System.out.println("环绕前置通知:"+name+"方法开始,参数是"+Arrays.asList(args));
            //利用反射调用目标方法,就是method.invoke()
            proceed = proceedingJoinPoint.proceed(args);
            System.out.println("环绕返回通知:"+name+"方法返回,返回值是"+proceed);
        } catch (Throwable e) {
            System.out.println("环绕异常通知"+name+"方法出现异常,异常信息是:"+e);
        }finally {
            System.out.println("环绕后置通知"+name+"方法结束");
        }
        return proceed;
    }
}
如果需要添加环绕通知呢,具体的执行顺序又会是什么顺序呢?
因为环绕通知在进行添加的时候,是在切面层引入的,所以在哪个切面添加环绕通知,那么就会在哪个切面执行。
# 基于配置的AOP配置
之前我们讲解了基于注解的AOP配置方式,下面我们开始讲一下基于xml的配置方式,虽然在现在的企业级开发中使用注解的方式比较多,但是你不能不会,因此需要简单的进行配置,注解配置快速简单,配置的方式共呢个完善。
将所有的注解都进行删除
添加配置文件
<?xml version="1.0" encoding="UTF-8"?>
<beans xmlns="http://www.springframework.org/schema/beans"
       xmlns:xsi="http://www.w3.org/2001/XMLSchema-instance"
       xmlns:context="http://www.springframework.org/schema/context"
       xmlns:aop="http://www.springframework.org/schema/aop"
       xsi:schemaLocation="http://www.springframework.org/schema/beans
                           http://www.springframework.org/schema/beans/spring-beans.xsd
                           http://www.springframework.org/schema/context
                           http://www.springframework.org/schema/context/spring-context.xsd
                           http://www.springframework.org/schema/aop
                           https://www.springframework.org/schema/aop/spring-aop.xsd
                           ">

    <context:component-scan base-package="com.mashibing"></context:component-scan>
    <aop:aspectj-autoproxy></aop:aspectj-autoproxy>

    <bean id="logUtil" class="com.mashibing.util.LogUtil2"></bean>
    <bean id="securityAspect" class="com.mashibing.util.SecurityAspect"></bean>
    <bean id="myCalculator" class="com.mashibing.inter.MyCalculator"></bean>
    <aop:config>
        <aop:pointcut id="globalPoint" expression="execution(public int com.mashibing.inter.MyCalculator.*(int,int))"/>
        <aop:aspect ref="logUtil">
            <aop:pointcut id="mypoint" expression="execution(public int com.mashibing.inter.MyCalculator.*(int,int))"/>
            <aop:before method="start" pointcut-ref="mypoint"></aop:before>
            <aop:after method="end" pointcut-ref="mypoint"></aop:after>
            <aop:after-returning method="stop" pointcut-ref="mypoint" returning="result"></aop:after-returning>
            <aop:after-throwing method="logException" pointcut-ref="mypoint" throwing="exception"></aop:after-throwing>
            <aop:around method="myAround" pointcut-ref="mypoint"></aop:around>
        </aop:aspect>
        <aop:aspect ref="securityAspect">
            <aop:before method="start" pointcut-ref="globalPoint"></aop:before>
            <aop:after method="end" pointcut-ref="globalPoint"></aop:after>
            <aop:after-returning method="stop" pointcut-ref="globalPoint" returning="result"></aop:after-returning>
            <aop:after-throwing method="logException" pointcut-ref="globalPoint" throwing="exception"></aop:after-throwing>
            <aop:around method="myAround" pointcut-ref="mypoint"></aop:around>
        </aop:aspect>
    </aop:config>
</beans>
# Spring AOP的应用配置
# Spring JdbcTemplate
在spring中为了更加方便的操作JDBC,在JDBC的基础之上定义了一个抽象层,此设计的目的是为不同类型的JDBC操作提供模板方法,每个模板方法都能控制整个过程,并允许覆盖过程中的特定任务,通过这种方式,可以尽可能保留灵活性,将数据库存取的工作量讲到最低。
# 1. 配置并测试数据源
pom.xml
<?xml version="1.0" encoding="UTF-8"?>
<project xmlns="http://maven.apache.org/POM/4.0.0"
         xmlns:xsi="http://www.w3.org/2001/XMLSchema-instance"
         xsi:schemaLocation="http://maven.apache.org/POM/4.0.0 http://maven.apache.org/xsd/maven-4.0.0.xsd">
    <modelVersion>4.0.0</modelVersion>

    <groupId>com.mashibing</groupId>
    <artifactId>spring_demo</artifactId>
    <version>1.0-SNAPSHOT</version>

    <dependencies>
        <!-- https://mvnrepository.com/artifact/org.springframework/spring-context -->
        <dependency>
            <groupId>org.springframework</groupId>
            <artifactId>spring-context</artifactId>
            <version>5.2.3.RELEASE</version>
        </dependency>

        <!-- https://mvnrepository.com/artifact/com.alibaba/druid -->
        <dependency>
            <groupId>com.alibaba</groupId>
            <artifactId>druid</artifactId>
            <version>1.1.21</version>
        </dependency>
        <!-- https://mvnrepository.com/artifact/mysql/mysql-connector-java -->
        <dependency>
            <groupId>mysql</groupId>
            <artifactId>mysql-connector-java</artifactId>
            <version>5.1.47</version>
        </dependency>
        <!-- https://mvnrepository.com/artifact/cglib/cglib -->
        <dependency>
            <groupId>cglib</groupId>
            <artifactId>cglib</artifactId>
            <version>3.3.0</version>
        </dependency>
        <!-- https://mvnrepository.com/artifact/org.aspectj/aspectjweaver -->
        <dependency>
            <groupId>org.aspectj</groupId>
            <artifactId>aspectjweaver</artifactId>
            <version>1.9.5</version>
        </dependency>
        <!-- https://mvnrepository.com/artifact/aopalliance/aopalliance -->
        <dependency>
            <groupId>aopalliance</groupId>
            <artifactId>aopalliance</artifactId>
            <version>1.0</version>
        </dependency>
        <!-- https://mvnrepository.com/artifact/org.springframework/spring-aspects -->
        <dependency>
            <groupId>org.springframework</groupId>
            <artifactId>spring-aspects</artifactId>
            <version>5.2.3.RELEASE</version>
        </dependency>
    </dependencies>

</project>
dbconfig.properties
jdbc.username=root123
password=123456
url=jdbc:mysql://localhost:3306/demo
driverClassName=com.mysql.jdbc.Driver
applicationContext.xml
<?xml version="1.0" encoding="UTF-8"?>
<beans xmlns="http://www.springframework.org/schema/beans"
       xmlns:xsi="http://www.w3.org/2001/XMLSchema-instance"
       xmlns:context="http://www.springframework.org/schema/context"
       xmlns:aop="http://www.springframework.org/schema/aop"
       xsi:schemaLocation="http://www.springframework.org/schema/beans
                           http://www.springframework.org/schema/beans/spring-beans.xsd
                           http://www.springframework.org/schema/context
                           http://www.springframework.org/schema/context/spring-context.xsd
                           http://www.springframework.org/schema/aop
                           https://www.springframework.org/schema/aop/spring-aop.xsd
                           ">
    <context:property-placeholder location="classpath:dbconfig.properties"></context:property-placeholder>
    <bean id="dataSource" class="com.alibaba.druid.pool.DruidDataSource">
        <property name="username" value="${jdbc.username}"></property>
        <property name="password" value="${jdbc.password}"></property>
        <property name="url" value="${jdbc.url}"></property>
        <property name="driverClassName" value="${jdbc.driverClassName}"></property>
    </bean>
</beans>
MyTest.java
import com.alibaba.druid.pool.DruidDataSource;
import org.springframework.context.ApplicationContext;
import org.springframework.context.support.ClassPathXmlApplicationContext;
import java.sql.SQLException;

public class MyTest {
    public static void main(String[] args) throws SQLException {
        ApplicationContext context = new ClassPathXmlApplicationContext("jdbcTemplate.xml");
        DruidDataSource dataSource = context.getBean("dataSource", DruidDataSource.class);
        System.out.println(dataSource);
        System.out.println(dataSource.getConnection());
    }
}
# 2. 给spring容器添加JdbcTemplate
spring容器提供了一个JdbcTemplate类,用来方便操作数据库。
1、添加pom依赖
pom.xml
<!-- https://mvnrepository.com/artifact/org.springframework/spring-orm -->
<dependency>
    <groupId>org.springframework</groupId>
    <artifactId>spring-orm</artifactId>
    <version>5.2.3.RELEASE</version>
</dependency>
jdbcTemplate.xml
<?xml version="1.0" encoding="UTF-8"?>
<beans xmlns="http://www.springframework.org/schema/beans"
       xmlns:xsi="http://www.w3.org/2001/XMLSchema-instance"
       xmlns:context="http://www.springframework.org/schema/context"
       xmlns:aop="http://www.springframework.org/schema/aop"
       xsi:schemaLocation="http://www.springframework.org/schema/beans
                           http://www.springframework.org/schema/beans/spring-beans.xsd
                           http://www.springframework.org/schema/context
                           http://www.springframework.org/schema/context/spring-context.xsd
                           http://www.springframework.org/schema/aop
                           https://www.springframework.org/schema/aop/spring-aop.xsd
                           ">
    <context:property-placeholder location="classpath:dbconfig.properties"></context:property-placeholder>
    <bean id="dataSource" class="com.alibaba.druid.pool.DruidDataSource">
        <property name="username" value="${jdbc.username}"></property>
        <property name="password" value="${jdbc.password}"></property>
        <property name="url" value="${jdbc.url}"></property>
        <property name="driverClassName" value="${jdbc.driverClassName}"></property>
    </bean>
    <bean id="jdbcTemplate" class="org.springframework.jdbc.core.JdbcTemplate">
        <constructor-arg name="dataSource" ref="dataSource"></constructor-arg>
    </bean>
</beans>
MyTest.java
import com.alibaba.druid.pool.DruidDataSource;
import org.springframework.context.ApplicationContext;
import org.springframework.context.support.ClassPathXmlApplicationContext;
import org.springframework.jdbc.core.JdbcTemplate;

import java.sql.SQLException;

public class MyTest {
    public static void main(String[] args) throws SQLException {
        ApplicationContext context = new ClassPathXmlApplicationContext("jdbcTemplate.xml");
        JdbcTemplate jdbcTemplate = context.getBean("jdbcTemplate", JdbcTemplate.class);
        System.out.println(jdbcTemplate);
    }
}
# 3. 插入数据
MyTest.java
import com.alibaba.druid.pool.DruidDataSource;
import org.springframework.beans.factory.annotation.Autowired;
import org.springframework.context.ApplicationContext;
import org.springframework.context.support.ClassPathXmlApplicationContext;
import org.springframework.jdbc.core.JdbcTemplate;

import java.sql.SQLException;

public class MyTest {
    public static void main(String[] args) throws SQLException {
        ApplicationContext context = new ClassPathXmlApplicationContext("jdbcTemplate.xml");
        JdbcTemplate jdbcTemplate = context.getBean("jdbcTemplate", JdbcTemplate.class);
        String sql = "insert into emp(empno,ename) values(?,?)";
        int result = jdbcTemplate.update(sql, 1111, "zhangsan");
        System.out.println(result);
    }
}
# 4. 批量插入数据
MyTest.java
import com.alibaba.druid.pool.DruidDataSource;
import org.springframework.beans.factory.annotation.Autowired;
import org.springframework.context.ApplicationContext;
import org.springframework.context.support.ClassPathXmlApplicationContext;
import org.springframework.jdbc.core.JdbcTemplate;

import java.sql.SQLException;
import java.util.ArrayList;
import java.util.List;

public class MyTest {
    public static void main(String[] args) throws SQLException {
        ApplicationContext context = new ClassPathXmlApplicationContext("jdbcTemplate.xml");
        JdbcTemplate jdbcTemplate = context.getBean("jdbcTemplate", JdbcTemplate.class);
        String sql = "insert into emp(empno,ename) values(?,?)";
        List<Object[]> list = new ArrayList<Object[]>();
        list.add(new Object[]{1,"zhangsan1"});
        list.add(new Object[]{2,"zhangsan2"});
        list.add(new Object[]{3,"zhangsan3"});
        int[] result = jdbcTemplate.batchUpdate(sql, list);
        for (int i : result) {
            System.out.println(i);
        }
    }
}
# 5. 查询某个值,并以对象的方式返回
MyTest.java
import com.mashibing.bean.Emp;
import org.springframework.context.ApplicationContext;
import org.springframework.context.support.ClassPathXmlApplicationContext;
import org.springframework.jdbc.core.BeanPropertyRowMapper;
import org.springframework.jdbc.core.JdbcTemplate;
import java.sql.SQLException;

public class MyTest {
    public static void main(String[] args) throws SQLException {
        ApplicationContext context = new ClassPathXmlApplicationContext("jdbcTemplate.xml");
        JdbcTemplate jdbcTemplate = context.getBean("jdbcTemplate", JdbcTemplate.class);
        String sql = "select * from emp where empno = ?";
        Emp emp = jdbcTemplate.queryForObject(sql, new BeanPropertyRowMapper<>(Emp.class), 7369);
        System.out.println(emp);
    }
}
# 6. 查询返回集合对象
MyTest.java
import com.mashibing.bean.Emp;
import org.springframework.context.ApplicationContext;
import org.springframework.context.support.ClassPathXmlApplicationContext;
import org.springframework.jdbc.core.BeanPropertyRowMapper;
import org.springframework.jdbc.core.JdbcTemplate;
import java.sql.SQLException;
import java.util.List;

public class MyTest {
    public static void main(String[] args) throws SQLException {
        ApplicationContext context = new ClassPathXmlApplicationContext("jdbcTemplate.xml");
        JdbcTemplate jdbcTemplate = context.getBean("jdbcTemplate", JdbcTemplate.class);
        String sql = "select * from emp where sal > ?";
        List<Emp> query = jdbcTemplate.query(sql, new BeanPropertyRowMapper<>(Emp.class), 1500);
        for (Emp emp : query) {
            System.out.println(emp);
        }
    }
}
# 7. 返回聚合函数的值
MyTest.java
import com.mashibing.bean.Emp;
import org.springframework.context.ApplicationContext;
import org.springframework.context.support.ClassPathXmlApplicationContext;
import org.springframework.jdbc.core.BeanPropertyRowMapper;
import org.springframework.jdbc.core.JdbcTemplate;
import java.sql.SQLException;
import java.util.List;

public class MyTest {
    public static void main(String[] args) throws SQLException {
        ApplicationContext context = new ClassPathXmlApplicationContext("jdbcTemplate.xml");
        JdbcTemplate jdbcTemplate = context.getBean("jdbcTemplate", JdbcTemplate.class);
        String sql = "select max(sal) from emp";
        Double aDouble = jdbcTemplate.queryForObject(sql, Double.class);
        System.out.println(aDouble);
    }
}
# 8. 使用具备具名函数的JdbcTemplate
jdbcTemplate.xml
<?xml version="1.0" encoding="UTF-8"?>
<beans xmlns="http://www.springframework.org/schema/beans"
       xmlns:xsi="http://www.w3.org/2001/XMLSchema-instance"
       xmlns:context="http://www.springframework.org/schema/context"
       xmlns:aop="http://www.springframework.org/schema/aop"
       xsi:schemaLocation="http://www.springframework.org/schema/beans
       http://www.springframework.org/schema/beans/spring-beans.xsd
       http://www.springframework.org/schema/context
       http://www.springframework.org/schema/context/spring-context.xsd
       http://www.springframework.org/schema/aop
       https://www.springframework.org/schema/aop/spring-aop.xsd
">
    <context:property-placeholder location="classpath:dbconfig.properties"></context:property-placeholder>
    <bean id="dataSource" class="com.alibaba.druid.pool.DruidDataSource">
        <property name="username" value="${jdbc.username}"></property>
        <property name="password" value="${jdbc.password}"></property>
        <property name="url" value="${jdbc.url}"></property>
        <property name="driverClassName" value="${jdbc.driverClassName}"></property>
    </bean>
    <bean id="jdbcTemplate" class="org.springframework.jdbc.core.JdbcTemplate">
        <constructor-arg name="dataSource" ref="dataSource"></constructor-arg>
    </bean>
    <bean id="namedParameterJdbcTemplate" class="org.springframework.jdbc.core.namedparam.NamedParameterJdbcTemplate">
        <constructor-arg name="dataSource" ref="dataSource"></constructor-arg>
    </bean>
</beans>
MyTest.java
import com.mashibing.bean.Emp;
import org.springframework.context.ApplicationContext;
import org.springframework.context.support.ClassPathXmlApplicationContext;
import org.springframework.jdbc.core.BeanPropertyRowMapper;
import org.springframework.jdbc.core.JdbcTemplate;
import org.springframework.jdbc.core.namedparam.NamedParameterJdbcTemplate;

import java.sql.SQLException;
import java.util.HashMap;
import java.util.List;
import java.util.Map;

public class MyTest {
    public static void main(String[] args) throws SQLException {
        ApplicationContext context = new ClassPathXmlApplicationContext("jdbcTemplate.xml");
        NamedParameterJdbcTemplate jdbcTemplate = context.getBean("namedParameterJdbcTemplate", NamedParameterJdbcTemplate.class);
        String sql = "insert into emp(empno,ename) values(:empno,:ename)";
        Map<String,Object> map = new HashMap<>();
        map.put("empno",2222);
        map.put("ename","sili");
        int update = jdbcTemplate.update(sql, map);
        System.out.println(update);
    }
}
# 9. 整合EmpDao
jdbcTemplate.xml
<context:component-scan base-package="com.mashibing"></context:component-scan>
EmpDao.java
package com.mashibing.dao;

import com.mashibing.bean.Emp;
import org.springframework.beans.factory.annotation.Autowired;
import org.springframework.jdbc.core.JdbcTemplate;

public class EmpDao {

    @Autowired
    private JdbcTemplate jdbcTemplate;

    public void save(Emp emp){
        String sql = "insert into emp(empno,ename) values(?,?)";
        int update = jdbcTemplate.update(sql, emp.getEmpno(), emp.getEname());
        System.out.println(update);
    }
}
MyTest.java
import com.mashibing.bean.Emp;
import com.mashibing.dao.EmpDao;
import org.springframework.context.ApplicationContext;
import org.springframework.context.support.ClassPathXmlApplicationContext;
import org.springframework.jdbc.core.namedparam.NamedParameterJdbcTemplate;

import java.sql.SQLException;
import java.util.HashMap;
import java.util.Map;

public class MyTest {
    public static void main(String[] args) throws SQLException {
        ApplicationContext context = new ClassPathXmlApplicationContext("jdbcTemplate.xml");
        EmpDao empDao = context.getBean("empDao", EmpDao.class);
        empDao.save(new Emp(3333,"wangwu"));
    }
}
# 10. 总结 AOP 切面编程
优先使用JDK自己的动态代理,如果发现要代理的对象没有接口时,会使用Cglib的动态代理
# JDK的动态代理:只能代理有接口的实现类
# Cjlib 可以代理所有的类
# 执行顺序
- 正常执行:@Before--->@After--->@AfterReturning
- 异常执行:@Before--->@After--->@AfterThrowing
# 环绕通知的执行顺序
- 正常执行:环绕前置(方法执行前)-->普通前置(方法执行前)@Before-->目标方法执行-->环绕后置(方法执行后)-->环绕最终返回-->普通后置(方法执行后)@After-->普通最终返回@AfterReturning。
- 异常执行:环绕前置(方法执行前)-->普通前置(方法执行前)@Before-->目标方法执行-->环绕执行异常-->环绕最终返回-->普通后置(方法执行后)@After-->普通执行异常@AfterThrowing。
环绕@Before-->普通前置@Before-->目标方法执行-->环绕正常结束/出现异常-->环绕后置-->普通后置-->普通返回或者异常。
# 声明式事务
# 1. 环境准备
tx.sql
DROP TABLE IF EXISTS `account`;
CREATE TABLE `account` (
  `username` varchar(10) NOT NULL DEFAULT '',
  `balance` double DEFAULT NULL,
  PRIMARY KEY (`username`)
) ENGINE=InnoDB DEFAULT CHARSET=utf8mb4;

INSERT INTO account VALUES ('lisi', '1000');
INSERT INTO account VALUES ('zhangsan', '1000');

DROP TABLE IF EXISTS `book`;
CREATE TABLE `book` (
  `id` int(10) NOT NULL,
  `book_name` varchar(10) DEFAULT NULL,
  `price` double DEFAULT NULL,
  PRIMARY KEY (`id`)
) ENGINE=InnoDB DEFAULT CHARSET=utf8mb4;

INSERT INTO book VALUES ('1', '西游记', '100');
INSERT INTO book VALUES ('2', '水浒传', '100');
INSERT INTO book VALUES ('3', '三国演义', '100');
INSERT INTO book VALUES ('4', '红楼梦', '100');

DROP TABLE IF EXISTS `book_stock`;
CREATE TABLE `book_stock` (
  `id` int(255) NOT NULL DEFAULT '0',
  `stock` int(11) DEFAULT NULL,
  PRIMARY KEY (`id`)
) ENGINE=InnoDB DEFAULT CHARSET=utf8mb4;

INSERT INTO book_stock VALUES ('1', '1000');
INSERT INTO book_stock VALUES ('2', '1000');
INSERT INTO book_stock VALUES ('3', '1000');
INSERT INTO book_stock VALUES ('4', '1000');
BookDao.java
package com.mashibing.dao;

import org.springframework.beans.factory.annotation.Autowired;
import org.springframework.jdbc.core.JdbcTemplate;
import org.springframework.stereotype.Repository;

@Repository
public class BookDao {

    @Autowired
    JdbcTemplate jdbcTemplate;

    /**
     * 减去某个用户的余额
     * @param userName
     * @param price
     */
    public void updateBalance(String userName,int price){
        String sql = "update account set balance=balance-? where username=?";
        jdbcTemplate.update(sql,price,userName);
    }

    /**
     * 按照图书的id来获取图书的价格
     * @param id
     * @return
     */
    public int getPrice(int id){
        String sql = "select price from book where id=?";
        return jdbcTemplate.queryForObject(sql,Integer.class,id);
    }

    /**
     * 减库存,减去某本书的库存
     * @param id
     */
    public void updateStock(int id){
        String sql = "update book_stock set stock=stock-1 where id=?";
        jdbcTemplate.update(sql,id);
    }
}
BookService.java
package com.mashibing.service;

import com.mashibing.dao.BookDao;
import org.springframework.beans.factory.annotation.Autowired;
import org.springframework.stereotype.Service;

@Service
public class BookService {

    @Autowired
    BookDao bookDao;

    /**
     * 结账:传入哪个用户买了哪本书
     * @param username
     * @param id
     */
    public void checkout(String username,int id){

        bookDao.updateStock(id);
        int price = bookDao.getPrice(id);
        bookDao.updateBalance(username,price);
    }
}
MyTest.java
import com.mashibing.service.BookService;
import org.springframework.context.ApplicationContext;
import org.springframework.context.support.ClassPathXmlApplicationContext;
import java.sql.SQLException;

public class MyTest {
    public static void main(String[] args) throws SQLException {
        ApplicationContext context = new ClassPathXmlApplicationContext("jdbcTemplate.xml");
        BookService bookService = context.getBean("bookService", BookService.class);
        bookService.checkout("zhangsan","1");
    }
}
总结:在事务控制方面,主要有两个分类:
- 编程式事务:在代码中直接加入处理事务的逻辑,可能需要在代码中显式调用beginTransaction()、commit()、rollback()等事务管理相关的方法。
- 声明式事务:在方法的外部添加注解或者直接在配置文件中定义,将事务管理代码从业务方法中分离出来,以声明的方式来实现事务管理。spring的AOP恰好可以完成此功能:事务管理代码的固定模式作为一种横切关注点,通过AOP方法模块化,进而实现声明式事务。
# 2. 声明式事务的简单配置
Spring从不同的事务管理API中抽象出了一整套事务管理机制,让事务管理代码从特定的事务技术中独立出来。开发人员通过配置的方式进行事务管理,而不必了解其底层是如何实现的。
Spring的核心事务管理抽象是PlatformTransactionManager。它为事务管理封装了一组独立于技术的方法。无论使用Spring的哪种事务管理策略(编程式或声明式),事务管理器都是必须的。
事务管理器可以以普通的bean的形式声明在Spring IOC容器中。下图是spring提供的事务管理器
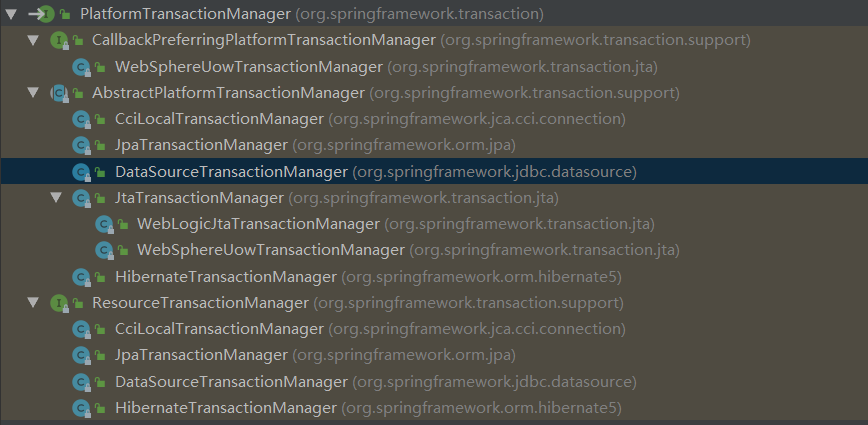
在配置文件中添加事务管理器
jdbcTemplate.xml
<?xml version="1.0" encoding="UTF-8"?>
<beans xmlns="http://www.springframework.org/schema/beans"
       xmlns:xsi="http://www.w3.org/2001/XMLSchema-instance"
       xmlns:context="http://www.springframework.org/schema/context"
       xmlns:aop="http://www.springframework.org/schema/aop"
       xmlns:tx="http://www.springframework.org/schema/tx"
       xsi:schemaLocation="http://www.springframework.org/schema/beans
                           http://www.springframework.org/schema/beans/spring-beans.xsd
                           http://www.springframework.org/schema/context
                           http://www.springframework.org/schema/context/spring-context.xsd
                           http://www.springframework.org/schema/aop
                           https://www.springframework.org/schema/aop/spring-aop.xsd
                           http://www.springframework.org/schema/tx
                           https://www.springframework.org/schema/tx/spring-tx.xsd
                           ">
    <context:component-scan base-package="com.mashibing"></context:component-scan>
    <context:property-placeholder location="classpath:dbconfig.properties"></context:property-placeholder>
    <bean id="dataSource" class="com.alibaba.druid.pool.DruidDataSource">
        <property name="username" value="${jdbc.username}"></property>
        <property name="password" value="${jdbc.password}"></property>
        <property name="url" value="${jdbc.url}"></property>
        <property name="driverClassName" value="${jdbc.driverClassName}"></property>
    </bean>
    <bean id="jdbcTemplate" class="org.springframework.jdbc.core.JdbcTemplate">
        <constructor-arg name="dataSource" ref="dataSource"></constructor-arg>
    </bean>
    <!--事务控制-->
    <!--配置事务管理器的bean-->
    <bean id="transactionManager" class="org.springframework.jdbc.datasource.DataSourceTransactionManager">
        <property name="dataSource" ref="dataSource"></property>
    </bean>
    <!--开启基于注解的事务控制模式,依赖tx名称空间-->
    <tx:annotation-driven transaction-manager="transactionManager"></tx:annotation-driven>
</beans>
BookService.java
package com.mashibing.service;

import com.mashibing.dao.BookDao;
import org.springframework.beans.factory.annotation.Autowired;
import org.springframework.stereotype.Service;
import org.springframework.transaction.annotation.Transactional;

@Service
public class BookService {

    @Autowired
    BookDao bookDao;

    /**
     * 结账:传入哪个用户买了哪本书
     * @param username
     * @param id
     */
    @Transactional
    public void checkout(String username,int id){

        bookDao.updateStock(id);
        int price = bookDao.getPrice(id);
        bookDao.updateBalance(username,price);
    }
}
# 3. 事务配置的属性
isolation:设置事务的隔离级别
propagation:事务的传播行为
noRollbackFor:那些异常事务可以不回滚
noRollbackForClassName:填写的参数是全类名
rollbackFor:哪些异常事务需要回滚
rollbackForClassName:填写的参数是全类名
readOnly:设置事务是否为只读事务
timeout:事务超出指定执行时长后自动终止并回滚,单位是秒
# 4. 测试超时属性
BookService.java
package com.mashibing.service;

import com.mashibing.dao.BookDao;
import org.springframework.beans.factory.annotation.Autowired;
import org.springframework.stereotype.Service;
import org.springframework.transaction.annotation.Transactional;

@Service
public class BookService {

    @Autowired
    BookDao bookDao;

    /**
     * 结账:传入哪个用户买了哪本书
     * @param username
     * @param id
     */
    @Transactional(timeout = 3)
    public void checkout(String username,int id){

        bookDao.updateStock(id);
        try {
            Thread.sleep(3000);
        } catch (InterruptedException e) {
            e.printStackTrace();
        }
        int price = bookDao.getPrice(id);
        bookDao.updateBalance(username,price);
    }
}
# 5. 设置事务只读
如果你一次执行单条查询语句,则没有必要启用事务支持,数据库默认支持SQL执行期间的读一致性;
如果你一次执行多条查询语句,例如统计查询,报表查询,在这种场景下,多条查询SQL必须保证整体的读一致性,否则,在前条SQL查询之后,后条SQL查询之前,数据被其他用户改变,则该次整体的统计查询将会出现读数据不一致的状态,此时,应该启用事务支持。
对于只读查询,可以指定事务类型为readonly,即只读事务。由于只读事务不存在数据的修改,因此数据库将会为只读事务提供一些优化手段
BookService.java
package com.mashibing.service;

import com.mashibing.dao.BookDao;
import org.springframework.beans.factory.annotation.Autowired;
import org.springframework.stereotype.Service;
import org.springframework.transaction.annotation.Transactional;

@Service
public class BookService {

    @Autowired
    BookDao bookDao;

    /**
     * 结账:传入哪个用户买了哪本书
     * @param username
     * @param id
     */
    @Transactional(timeout = 3,readOnly = true)
    public void checkout(String username,int id){

        bookDao.updateStock(id);
        int price = bookDao.getPrice(id);
        bookDao.updateBalance(username,price);
    }
}
# 6. 设置哪些异常不回滚
注意:运行时异常默认回滚,编译时异常默认不回滚
BookService.java
package com.mashibing.service;

import com.mashibing.dao.BookDao;
import org.springframework.beans.factory.annotation.Autowired;
import org.springframework.stereotype.Service;
import org.springframework.transaction.annotation.Transactional;

@Service
public class BookService {

    @Autowired
    BookDao bookDao;

    /**
     * 结账:传入哪个用户买了哪本书
     * @param username
     * @param id
     */
    @Transactional(timeout = 3,noRollbackFor = {ArithmeticException.class,NullPointerException.class})
    public void checkout(String username,int id){

        bookDao.updateStock(id);
        int price = bookDao.getPrice(id);
        bookDao.updateBalance(username,price);
        int i = 1/0;
    }

        @Transactional(timeout = 3,noRollbackForClassName = {"java.lang.ArithmeticException"})
    public void checkout(String username,int id){

        bookDao.updateStock(id);
        int price = bookDao.getPrice(id);
        bookDao.updateBalance(username,price);
        int i = 1/0;
    }
}
# 7. 设置哪些异常回滚
BookService.java
package com.mashibing.service;

import com.mashibing.dao.BookDao;
import org.springframework.beans.factory.annotation.Autowired;
import org.springframework.stereotype.Service;
import org.springframework.transaction.annotation.Transactional;

import java.io.File;
import java.io.FileInputStream;
import java.io.FileNotFoundException;

@Service
public class BookService {

    @Autowired
    BookDao bookDao;

    /**
     * 结账:传入哪个用户买了哪本书
     * @param username
     * @param id
     */
    @Transactional(timeout = 3,rollbackFor = {FileNotFoundException.class})
    public void checkout(String username,int id) throws FileNotFoundException {

        bookDao.updateStock(id);
        int price = bookDao.getPrice(id);
        bookDao.updateBalance(username,price);
//        int i = 1/0;
        new FileInputStream("aaa.txt");
    }
}
# 8. 设置隔离级别
隔离级别没有接触的同学可以看我之前的事务视频,里面有详细讲解,此处不再赘述。
BookService.java
package com.mashibing.service;

import com.mashibing.dao.BookDao;
import org.springframework.beans.factory.annotation.Autowired;
import org.springframework.stereotype.Service;
import org.springframework.transaction.annotation.Isolation;
import org.springframework.transaction.annotation.Transactional;

import java.io.File;
import java.io.FileInputStream;
import java.io.FileNotFoundException;

@Service
public class BookService {

    @Autowired
    BookDao bookDao;

    /**
     * 结账:传入哪个用户买了哪本书
     * @param username
     * @param id
     */
    @Transactional(timeout = 3,isolation = Isolation.READ_COMMITTED)
    public void checkout(String username,int id) throws FileNotFoundException {

        bookDao.updateStock(id);
        int price = bookDao.getPrice(id);
        bookDao.updateBalance(username,price);
//        int i = 1/0;
        new FileInputStream("aaa.txt");
    }
}
# 9. 事务的传播特性
事务的传播特性指的是当一个事务方法被另一个事务方法调用时,这个事务方法应该如何进行?
spring的事务传播行为一共有7种:
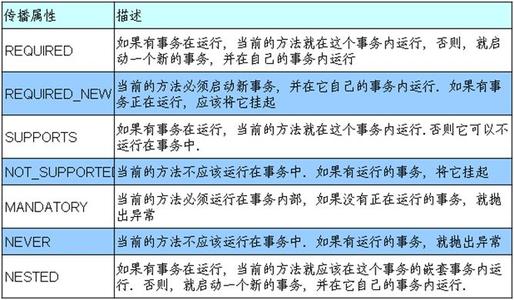
# 10. 测试事务的传播特性
BookDao.java
package com.mashibing.dao;

import org.springframework.beans.factory.annotation.Autowired;
import org.springframework.jdbc.core.JdbcTemplate;
import org.springframework.stereotype.Repository;

@Repository
public class BookDao {

    @Autowired
    JdbcTemplate jdbcTemplate;

    /**
     * 减去某个用户的余额
     * @param userName
     * @param price
     */
    public void updateBalance(String userName,int price){
        String sql = "update account set balance=balance-? where username=?";
        jdbcTemplate.update(sql,price,userName);
    }

    /**
     * 按照图书的id来获取图书的价格
     * @param id
     * @return
     */
    public int getPrice(int id){
        String sql = "select price from book where id=?";
        return jdbcTemplate.queryForObject(sql,Integer.class,id);
    }

    /**
     * 减库存,减去某本书的库存
     * @param id
     */
    public void updateStock(int id){
        String sql = "update book_stock set stock=stock-1 where id=?";
        jdbcTemplate.update(sql,id);
    }

    /**
     * 修改图书价格
     * @param id
     * @param price
     */
    public void updatePrice(int id,int price){
        String sql = "update book set price=? where id =?";
        jdbcTemplate.update(sql,price,id);
    }
}
BookService.java
package com.mashibing.service;

import org.springframework.beans.factory.annotation.Autowired;
import org.springframework.stereotype.Service;
import org.springframework.transaction.annotation.Isolation;
import org.springframework.transaction.annotation.Propagation;
import org.springframework.transaction.annotation.Transactional;

import java.io.File;
import java.io.FileInputStream;
import java.io.FileNotFoundException;

@Service
public class BookService {

    @Autowired
    BookDao bookDao;

    /**
     * 结账:传入哪个用户买了哪本书
     * @param username
     * @param id
     */
    @Transactional(propagation = Propagation.REQUIRED)
    public void checkout(String username,int id) {

        bookDao.updateStock(id);
        int price = bookDao.getPrice(id);
        bookDao.updateBalance(username,price);
    }

    @Transactional(propagation = Propagation.REQUIRED)
    public void updatePrice(int id,int price){
        bookDao.updatePrice(id,price);
        int i = 1/0;
    }
}
MulService.java
package com.mashibing.service;

import org.springframework.beans.factory.annotation.Autowired;
import org.springframework.stereotype.Service;
import org.springframework.transaction.annotation.Transactional;

@Service
public class MulService {

    @Autowired
    private BookService bookService;

    @Transactional
    public void mulTx(){
        bookService.checkout("zhangsan",1);
        bookService.updatePrice(1,1000);
    }
}
MyTest.java
import com.mashibing.service.MulService;
import org.springframework.context.ApplicationContext;
import org.springframework.context.support.ClassPathXmlApplicationContext;

public class MyTest {
    public static void main(String[] args) {
        ApplicationContext context = new ClassPathXmlApplicationContext("jdbcTemplate.xml");
        MulService mulService = context.getBean("mulService", MulService.class);
        mulService.mulTx();
    }
}
通过上图的结果发现,如果设置的传播特性是Required,那么所有的事务都会统一成一个事务,一旦发生错误,所有的数据都要进行回滚。
BookService.java
package com.mashibing.service;

import com.mashibing.dao.BookDao;
import org.springframework.beans.factory.annotation.Autowired;
import org.springframework.stereotype.Service;
import org.springframework.transaction.annotation.Isolation;
import org.springframework.transaction.annotation.Propagation;
import org.springframework.transaction.annotation.Transactional;

import java.io.File;
import java.io.FileInputStream;
import java.io.FileNotFoundException;

@Service
public class BookService {

    @Autowired
    BookDao bookDao;

    /**
     * 结账:传入哪个用户买了哪本书
     * @param username
     * @param id
     */
    @Transactional(propagation = Propagation.REQUIRES_NEW)
    public void checkout(String username,int id) {

        bookDao.updateStock(id);
        int price = bookDao.getPrice(id);
        bookDao.updateBalance(username,price);
    }

    @Transactional(propagation = Propagation.REQUIRED)
    public void updatePrice(int id,int price){
        bookDao.updatePrice(id,price);
        int i = 1/0;
    }
}
通过修改checkout方法的传播特性为Required_new,发现价格进行了回滚,而其他的数据没有进行回滚。
BookService.java
package com.mashibing.service;

import com.mashibing.dao.BookDao;
import org.springframework.beans.factory.annotation.Autowired;
import org.springframework.stereotype.Service;
import org.springframework.transaction.annotation.Isolation;
import org.springframework.transaction.annotation.Propagation;
import org.springframework.transaction.annotation.Transactional;

import java.io.File;
import java.io.FileInputStream;
import java.io.FileNotFoundException;

@Service
public class BookService {

    @Autowired
    BookDao bookDao;

    /**
     * 结账:传入哪个用户买了哪本书
     * @param username
     * @param id
     */
    @Transactional(propagation = Propagation.REQUIRED)
    public void checkout(String username,int id) {

        bookDao.updateStock(id);
        int price = bookDao.getPrice(id);
        bookDao.updateBalance(username,price);
    }

    @Transactional(propagation = Propagation.REQUIRED)
    public void updatePrice(int id,int price){
        bookDao.updatePrice(id,price);
    }
}
MulService.java
package com.mashibing.service;

import com.mashibing.bean.Book;
import org.springframework.beans.factory.annotation.Autowired;
import org.springframework.stereotype.Service;
import org.springframework.transaction.annotation.Transactional;

@Service
public class MulService {

    @Autowired
    private BookService bookService;

    @Transactional
    public void mulTx(){
        bookService.checkout("zhangsan",1);
        bookService.updatePrice(1,1000);
        int i = 1/0;
    }
}
将bookservice方法的传播行为为Required,并且将报错设置在MulService中,发现会都进行回滚。
BookService.java
package com.mashibing.service;

import com.mashibing.dao.BookDao;
import org.springframework.beans.factory.annotation.Autowired;
import org.springframework.stereotype.Service;
import org.springframework.transaction.annotation.Isolation;
import org.springframework.transaction.annotation.Propagation;
import org.springframework.transaction.annotation.Transactional;

import java.io.File;
import java.io.FileInputStream;
import java.io.FileNotFoundException;

@Service
public class BookService {

    @Autowired
    BookDao bookDao;

    /**
     * 结账:传入哪个用户买了哪本书
     * @param username
     * @param id
     */
    @Transactional(propagation = Propagation.REQUIRES_NEW)
    public void checkout(String username,int id) {

        bookDao.updateStock(id);
        int price = bookDao.getPrice(id);
        bookDao.updateBalance(username,price);
    }

    @Transactional(propagation = Propagation.REQUIRES_NEW)
    public void updatePrice(int id,int price){
        bookDao.updatePrice(id,price);
    }
}
MulService.java
package com.mashibing.service;

import com.mashibing.bean.Book;
import org.springframework.beans.factory.annotation.Autowired;
import org.springframework.stereotype.Service;
import org.springframework.transaction.annotation.Transactional;

@Service
public class MulService {

    @Autowired
    private BookService bookService;

    @Transactional
    public void mulTx(){
        bookService.checkout("zhangsan",1);
        bookService.updatePrice(1,1000);
        int i = 1/0;
    }
}
将bookservice方法的传播行为为Requires_new,并且将报错设置在MulService中,发现都不会进行回滚。
BookService.java
package com.mashibing.service;

import com.mashibing.dao.BookDao;
import org.springframework.beans.factory.annotation.Autowired;
import org.springframework.stereotype.Service;
import org.springframework.transaction.annotation.Isolation;
import org.springframework.transaction.annotation.Propagation;
import org.springframework.transaction.annotation.Transactional;

import java.io.File;
import java.io.FileInputStream;
import java.io.FileNotFoundException;

@Service
public class BookService {

    @Autowired
    BookDao bookDao;

    /**
     * 结账:传入哪个用户买了哪本书
     * @param username
     * @param id
     */
    @Transactional(propagation = Propagation.REQUIRES_NEW)
    public void checkout(String username,int id) {

        bookDao.updateStock(id);
        int price = bookDao.getPrice(id);
        bookDao.updateBalance(username,price);
    }

    @Transactional(propagation = Propagation.REQUIRES_NEW)
    public void updatePrice(int id,int price){
        bookDao.updatePrice(id,price);
    }

    @Transactional
    public void mulTx(){
        checkout("zhangsan",1);
        updatePrice(1,1000);
        int i = 1/0;
    }
}
如果在bookservice执行的话,会发现刚刚的效果就没有了,原因是外层调用的时候使用的AOP,但是本类方法自己的调用就是最最普通的调用,就是同一个事务。
总结:
1、事务传播级别是REQUIRED,当checkout()被调用时(假定被另一类中commit()调用),如果checkout()中的代码抛出异常,即便被捕获,commit()中的其他代码都会roll back

2、是REQUIRES_NEW,如果checkout()中的代码抛出异常,并且被捕获,commit()中的其他代码不会roll back;如果commit()中的其他代码抛出异常,而且没有捕获,不会导致checkout()回滚

3、是NESTED,如果checkout()中的代码抛出异常,并且被捕获,commit()中的其他代码不会roll back;如果commit()中的其他代码抛出异常,而且没有捕获,会导致checkout()回滚

    PROPAGATION_REQUIRES_NEW 启动一个新的, 不依赖于环境的 "内部" 事务. 这个事务将被完全 commited 或 rolled back 而不依赖于外部事务, 它拥有自己的隔离范围, 自己的锁, 等等. 当内部事务开始执行时, 外部事务将被挂起, 内务事务结束时, 外部事务将继续执行.
    另一方面, PROPAGATION_NESTED 开始一个 "嵌套的" 事务,  它是已经存在事务的一个真正的子事务. 嵌套事务开始执行时,  它将取得一个 savepoint. 如果这个嵌套事务失败, 我们将回滚到此 savepoint. 潜套事务是外部事务的一部分, 只有外部事务结束后它才会被提交.
    由此可见, PROPAGATION_REQUIRES_NEW 和 PROPAGATION_NESTED 的最大区别在于, PROPAGATION_REQUIRES_NEW 完全是一个新的事务, 而 PROPAGATION_NESTED 则是外部事务的子事务, 如果外部事务 commit, 嵌套事务也会被 commit, 这个规则同样适用于 roll back.
# 基于xml的事务配置
jdbcTemplate.xml
<?xml version="1.0" encoding="UTF-8"?>
<beans xmlns="http://www.springframework.org/schema/beans"
       xmlns:xsi="http://www.w3.org/2001/XMLSchema-instance"
       xmlns:context="http://www.springframework.org/schema/context"
       xmlns:aop="http://www.springframework.org/schema/aop"
       xmlns:tx="http://www.springframework.org/schema/tx"
       xsi:schemaLocation="http://www.springframework.org/schema/beans
                           http://www.springframework.org/schema/beans/spring-beans.xsd
                           http://www.springframework.org/schema/context
                           http://www.springframework.org/schema/context/spring-context.xsd
                           http://www.springframework.org/schema/aop
                           https://www.springframework.org/schema/aop/spring-aop.xsd
                           http://www.springframework.org/schema/tx
                           https://www.springframework.org/schema/tx/spring-tx.xsd
                           ">
    <context:component-scan base-package="com.mashibing"></context:component-scan>
    <context:property-placeholder location="classpath:dbconfig.properties"></context:property-placeholder>
    <bean id="dataSource" class="com.alibaba.druid.pool.DruidDataSource">
        <property name="username" value="${jdbc.username}"></property>
        <property name="password" value="${jdbc.password}"></property>
        <property name="url" value="${jdbc.url}"></property>
        <property name="driverClassName" value="${jdbc.driverClassName}"></property>
    </bean>
    <bean id="jdbcTemplate" class="org.springframework.jdbc.core.JdbcTemplate">
        <constructor-arg name="dataSource" ref="dataSource"></constructor-arg>
    </bean>
    <bean id="namedParameterJdbcTemplate" class="org.springframework.jdbc.core.namedparam.NamedParameterJdbcTemplate">
        <constructor-arg name="dataSource" ref="dataSource"></constructor-arg>
    </bean>
    <!--事务控制-->
    <!--配置事务管理器的bean-->
    <bean id="transactionManager" class="org.springframework.jdbc.datasource.DataSourceTransactionManager">
        <property name="dataSource" ref="dataSource"></property>
    </bean>
    <!--
    基于xml配置的事务:依赖tx名称空间和aop名称空间
        1、spring中提供事务管理器(切面),配置这个事务管理器
        2、配置出事务方法
        3、告诉spring哪些方法是事务方法(事务切面按照我们的切入点表达式去切入事务方法)
    -->
    <bean id="bookService" class="com.mashibing.service.BookService"></bean>
    <aop:config>
        <aop:pointcut id="txPoint" expression="execution(* com.mashibing.service.*.*(..))"/>
        <!--事务建议:advice-ref:指向事务管理器的配置-->
        <aop:advisor advice-ref="myAdvice" pointcut-ref="txPoint"></aop:advisor>
    </aop:config>
    <tx:advice id="myAdvice" transaction-manager="transactionManager">
        <!--事务属性-->
        <tx:attributes>
            <!--指明哪些方法是事务方法-->
            <tx:method name="*"/>
            <tx:method name="checkout" propagation="REQUIRED"/>
            <tx:method name="get*" read-only="true"></tx:method>
        </tx:attributes>
    </tx:advice>
</beans>
# 总结 transactionManager 事务管理
# 事务的处理
- 正常的事务提交(commit)或者回滚(rollback)
- 自动提交,但是一般情况下要将自动提交进行关闭,影响效率
- 用户关闭会话,会自动提交事务
- 系统崩溃或者断电的时候,自动回滚事务
- 当一次执行多条sql(同时包含DML语句和DDL语句)时,当在执行DDL语句之前,会自动提交事务,所以当遇到这种情况时,应当把DDL语句放在最后执行。
- sql分类:
- DML 数据操控:如select,insert,update,delete
- DCL 数据控制:如权限控制,grant,revoke
- DDL 数据定义:如create,alter,drop等表定义语句
# 事务的基本特性
事务的基本特性ACID:
- 原子性(Atomicity):一个原子事务要么完整执行,要么干脆不执行。这意味着,工作单元中的每项任务都必须正确执行。如果有任一任务执行失败,则整个工作单元或事务就会被终止。即此前对数据所作的任何修改都将被撤销。如果所有任务都被成功执行,事务就会被提交,即对数据所作的修改将会是永久性的。
- 一致性(Consistency):一致性代表了底层数据存储的完整性。它必须由事务系统和应用开发人员共同来保证。事务系统通过保证事务的原子性,隔离性和持久性来满足这一要求; 应用开发人员则需要保证数据库有适当的约束(主键,引用完整性等),并且工作单元中所实现的业务逻辑不会导致数据的不一致(即,数据预期所表达的现实业务情况不相一致)。例如,在一次转账过程中,从某一账户中扣除的金额必须与另一账户中存入的金额相等。支付宝账号100 你读到余额要取,有人向你转100 但是事物没提交(这时候你读到的余额应该是100,而不是200) 这种就是一致性。
- 隔离性(Isolation):隔离性意味着事务必须在不干扰其他进程或事务的前提下独立执行。换言之,在事务或工作单元执行完毕之前,其所访问的数据不能受系统其他部分的影响。
- 持久性(Durability):持久性表示在某个事务的执行过程中,对数据所作的所有改动都必须在事务成功结束前保存至某种物理存储设备。这样可以保证,所作的修改在任何系统瘫痪时不至于丢失。
# 隔离级别
- 脏读
所谓脏读,就是指事务A读到了事务B还没有提交的数据,比如银行取钱,事务A开启事务,此时切换到事务B,事务B开启事务-->取走100元,此时切换回事务A,事务A读取的肯定是数据库里面的原始数据,因为事务B取走了100块钱,并没有提交,数据库里面的账务余额肯定还是原始余额,这就是脏读。
- 不可重复读
所谓不可重复读,就是指在一个事务里面读取了两次某个数据,读出来的数据不一致。还是以银行取钱为例,事务A开启事务-->查出银行卡余额为1000元,此时切换到事务B事务B开启事务-->事务B取走100元-->提交,数据库里面余额变为900元,此时切换回事务A,事务A再查一次查出账户余额为900元,这样对事务A而言,在同一个事务内两次读取账户余额数据不一致,这就是不可重复读。
- 幻读
所谓幻读,就是指在一个事务里面的操作中发现了未被操作的数据。比如学生信息,事务A开启事务-->修改所有学生当天签到状况为false,此时切换到事务B,事务B开启事务-->事务B插入了一条学生数据,此时切换回事务A,事务A提交的时候发现了一条自己没有修改过的数据,这就是幻读,就好像发生了幻觉一样。幻读出现的前提是并发的事务中有事务发生了插入、删除操作。
| MySQL的事务隔离级别:默认可重复读 | 脏读 | 不可重复读 | 幻读 |
|---|---|---|---|
| 读未提交(read-uncommitted) | 是 | 是 | 是 |
| 读已提交(read-committed) | 否 | 是 | 是 |
| 可重复读(repeatable-read) | 否 | 否 | 是 |
| 序列化(serializable) | 否 | 否 | 否 |
| Oracle的事务隔离级别:默认读已提交 | 脏读 | 不可重复读 | 幻读 |
|---|---|---|---|
| 读已提交(read-committed) | 否 | 是 | 是 |
| 只读(read only) | 否 | 否 | 是 |
| 序列化(serializable) | 否 | 否 | 否 |
# 传播特性
- REQUIRED:支持当前事务,如果当前没有事务,就新建一个事务。这是默认的。
- REQUIRES_NEW:新建事务,如果当前存在事务,把当前事务挂起。
- SUPPORTS:支持当前事务,如果当前没有事务,就以非事务方式执行。
- NOT_SUPPORTED:以非事务方式执行操作,如果当前存在事务,就把当前事务挂起。
- MANDATORY:支持当前事务,如果当前没有事务,就抛出异常。
- NEVER:以非事务方式执行,如果当前存在事务,则抛出异常。
- NESTED:支持当前事务,如果当前事务存在,则执行一个嵌套事务,如果当前没有事务,就新建一个事务。
1.REQUIRED
1.1 REQUIRED
1.2 REQUIRED
三个方法在一个事务里面执行,全部正常则提交,只要有一个出现异常所有全部回滚
1.无事务
1.1 REQUIRED 出现异常
1.2 REQUIRED
1.1和1.2在两个单独的事务里面执行。谁报错谁回滚,谁不报错谁提交
1.REQUIRED
1.1 REQUIRES_NEW (独立的事务)
1.2 REQUIRED (和父方法在一个事务里)
1和1.2共用一个事务,1.1报错回滚,外面的事务能监测到异常,故外面的事务也会进行回滚
1和1.2共用一个事务,1.2报错回滚,1.1执行正常则不会回滚
1.REQUIRED
1.1 REQUIRES_NEW (独立的事务)
1.2 REQUIRES_NEW (独立的事务)
每一个方法都是一个独立的事务,谁报错谁回滚,谁不报错谁提交
- REQUIRED
1.1 SUPPORTS
运行在一个事务里,全部正常则提交,只要有一个出现异常所有全部回滚
1.无事务
1.1 SUPPORTS
不运行在事务里,成功的成功,失败的失败,不会回滚,数据可能会不一致
1.REQUIRED
1.1 NOT_SUPPORTED
虽然运行在事务里,但是不受事务的控制,成功的成功,失败的失败,不会回滚,数据可能会不一致
1.REQUIRED
1.1 NEVER(不能运行在事务里,如果有事务,则抛出异常)
抛出异常
1.无事务
1.1 MANDATORY (必须运行在事务里,如果没有事务,则抛出异常)
抛出异常
1.REQUIRED
1.1 NESTED(会创建一个嵌套的事务)
1.2 REQUIRED
1和1.2共用一个事务,1.1报错回滚,嵌套的子事务不会影响外面的事务,故外面的不会回滚
1和1.2共用一个事务,1.2报错回滚,影响到了嵌套的子事务,故子事务也会回滚
# Spring原理总结
# 1. 什么是Spring框架,Spring框架主要包含哪些模块
Spring是一个开源框架,Spring是一个轻量级的Java 开发框架。它是为了解决企业应用开发的复杂性而创建的。框架的主要优势之一就是其分层架构,分层架构允许使用者选择使用哪一个组件,同时为 J2EE 应用程序开发提供集成的框架。Spring使用基本的JavaBean来完成以前只可能由EJB完成的事情。然而,Spring的用途不仅限于服务器端的开发。从简单性、可测试性和松耦合的角度而言,任何Java应用都可以从Spring中受益。Spring的核心是控制反转(IoC)和面向切面(AOP)。简单来说,Spring是一个分层的full-stack(一站式) 轻量级开源框架。
主要包含的模块:

# 2. Spring框架的优势
- Spring通过DI、AOP和消除样板式代码来简化企业级Java开发
- Spring框架之外还存在一个构建在核心框架之上的庞大生态圈,它将Spring扩展到不同的领域,如Web服务、REST、移动开发以及NoSQL
- 低侵入式设计,代码的污染极低
- 独立于各种应用服务器,基于Spring框架的应用,可以真正实现Write Once,Run Anywhere的承诺
- Spring的IoC容器降低了业务对象替换的复杂性,提高了组件之间的解耦
- Spring的AOP允许将一些通用任务如安全、事务、日志等进行集中式处理,从而提供了更好的复用
- Spring的ORM和DAO提供了与第三方持久层框架的的良好整合,并简化了底层的数据库访问
- Spring的高度开放性,并不强制应用完全依赖于Spring,开发者可自由选用Spring框架的部分或全部
# 3. IOC和DI是什么?
控制反转是就是应用本身不负责依赖对象的创建和维护,依赖对象的创建及维护是由外部容器负责的,这样控制权就有应用转移到了外部容器,控制权的转移就是控制反转。
依赖注入是指:在程序运行期间,由外部容器动态地将依赖对象注入到组件中如:一般,通过构造函数注入或者setter注入。
# 4. 描述下Spring IOC容器的初始化过程
Spring IOC容器的初始化简单的可以分为三个过程:
- 第一个过程是Resource资源定位。这个Resouce指的是BeanDefinition的资源定位。这个过程就是容器找数据的过程,就像水桶装水需要先找到水一样。
- 第二个过程是BeanDefinition的载入过程。这个载入过程是把用户定义好的Bean表示成Ioc容器内部的数据结构,而这个容器内部的数据结构就是BeanDefition。
- 第三个过程是向IOC容器注册这些BeanDefinition的过程,这个过程就是将前面的BeanDefition保存到HashMap中的过程。
# 5. BeanFactory 和 FactoryBean的区别?
BeanFactory是个Factory,也就是IOC容器或对象工厂,在Spring中,所有的Bean都是由BeanFactory(也就是IOC容器)来进行管理的,提供了实例化对象和拿对象的功能。
使用场景:
- 从Ioc容器中获取Bean(byName or byType)
- 检索Ioc容器中是否包含指定的Bean
- 判断Bean是否为单例
FactoryBean是个Bean,这个Bean不是简单的Bean,而是一个能生产或者修饰对象生成的工厂Bean,它的实现与设计模式中的工厂模式和修饰器模式类似。
使用场景
- ProxyFactoryBean
# 6. BeanFactory和ApplicationContext的异同
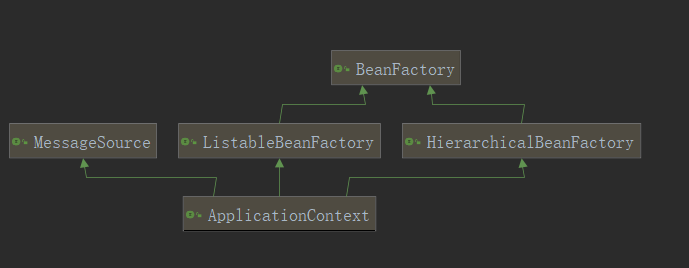
相同:
- Spring提供了两种不同的IOC 容器,一个是BeanFactory,另外一个是ApplicationContext,它们都是Java interface,ApplicationContext继承于BeanFactory(ApplicationContext继承ListableBeanFactory。
- 它们都可以用来配置XML属性,也支持属性的自动注入。
- 而ListableBeanFactory继承BeanFactory),BeanFactory 和 ApplicationContext 都提供了一种方式,使用getBean("bean name")获取bean。
不同:
- 当你调用getBean()方法时,BeanFactory仅实例化bean,而ApplicationContext 在启动容器的时候实例化单例bean,不会等待调用getBean()方法时再实例化。
- BeanFactory不支持国际化,即i18n,但ApplicationContext提供了对它的支持。
- BeanFactory与ApplicationContext之间的另一个区别是能够将事件发布到注册为监听器的bean。
- BeanFactory 的一个核心实现是XMLBeanFactory 而ApplicationContext 的一个核心实现是ClassPathXmlApplicationContext,Web容器的环境我们使用WebApplicationContext并且增加了getServletContext 方法。
- 如果使用自动注入并使用BeanFactory,则需要使用API注册AutoWiredBeanPostProcessor,如果使用ApplicationContext,则可以使用XML进行配置。
- 简而言之,BeanFactory提供基本的IOC和DI功能,而ApplicationContext提供高级功能,BeanFactory可用于测试和非生产使用,但ApplicationContext是功能更丰富的容器实现,应该优于BeanFactory
# 7. Spring Bean 的生命周期?
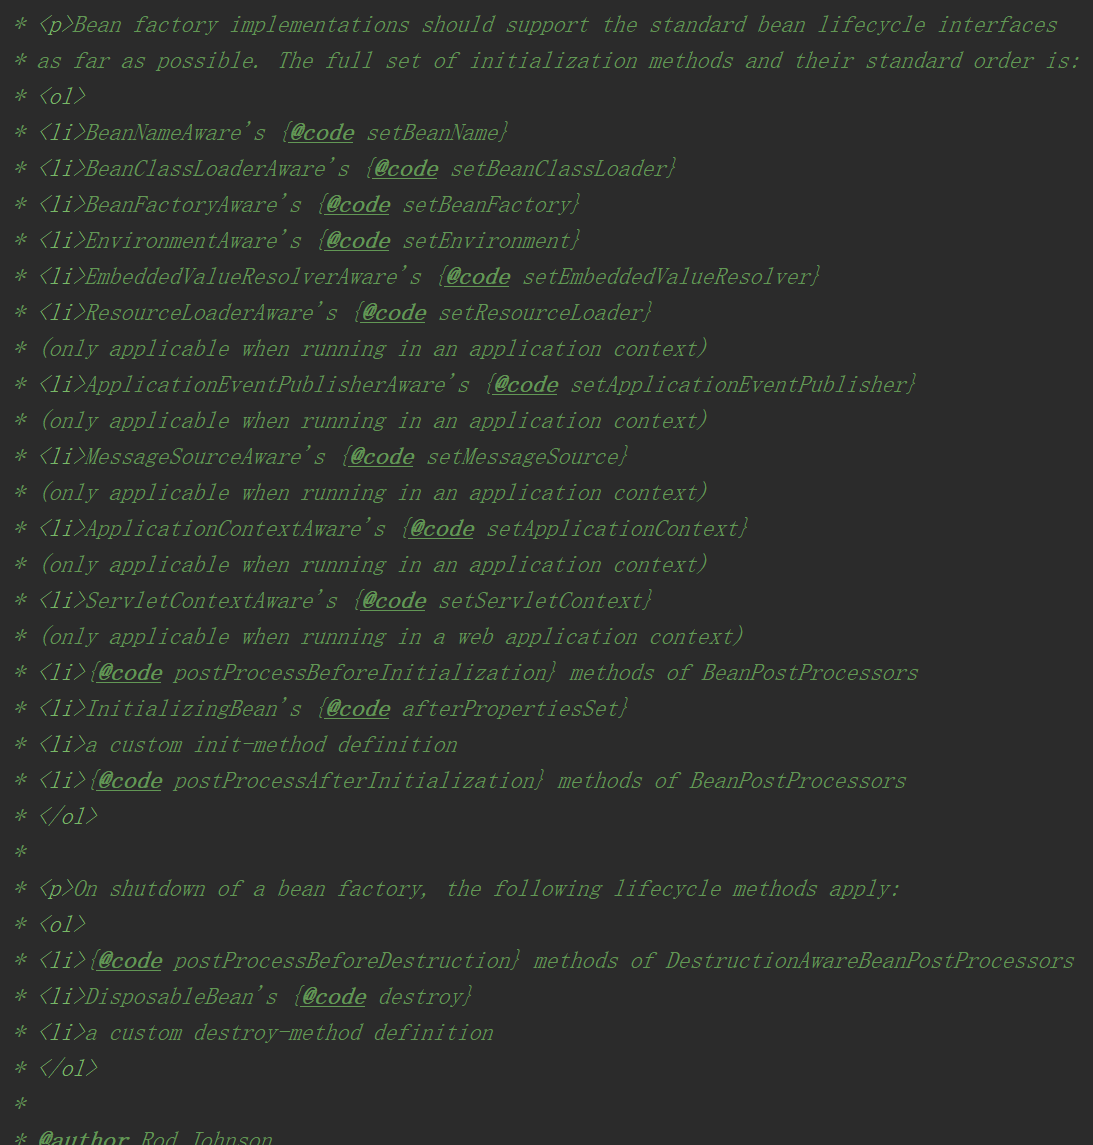
总结:
# 1. 实例化Bean:
对于BeanFactory容器,当客户向容器请求一个尚未初始化的bean时,或初始化bean的时候需要注入另一个尚未初始化的依赖时,容器就会调用createBean进行实例化。对于ApplicationContext容器,当容器启动结束后,通过获取BeanDefinition对象中的信息,实例化所有的bean。
# 2. 设置对象属性(依赖注入)
实例化后的对象被封装在BeanWrapper对象中,紧接着,Spring根据BeanDefinition中的信息 以及 通过BeanWrapper提供的设置属性的接口完成依赖注入。
# 3. 处理Aware接口
接着,Spring会检测该对象是否实现了xxxAware接口,并将相关的xxxAware实例注入给Bean:
①如果这个Bean已经实现了BeanNameAware接口,会调用它实现的setBeanName(String beanId)方法,此处传递的就是Spring配置文件中Bean的id值;
②如果这个Bean已经实现了BeanFactoryAware接口,会调用它实现的setBeanFactory()方法,传递的是Spring工厂自身。
③如果这个Bean已经实现了ApplicationContextAware接口,会调用setApplicationContext(ApplicationContext)方法,传入Spring上下文;
# 4. BeanPostProcessor
如果想对Bean进行一些自定义的处理,那么可以让Bean实现了BeanPostProcessor接口,那将会调用postProcessBeforeInitialization(Object obj, String s)方法。
# 5. InitializingBean 与 init-method
如果Bean在Spring配置文件中配置了 init-method 属性,则会自动调用其配置的初始化方法。
# 6. 如果这个Bean实现了BeanPostProcessor接口
将会调用postProcessAfterInitialization(Object obj, String s)方法;由于这个方法是在Bean初始化结束时调用的,所以可以被应用于内存或缓存技术;
以上几个步骤完成后,Bean就已经被正确创建了,之后就可以使用这个Bean了。
# 7. DisposableBean
当Bean不再需要时,会经过清理阶段,如果Bean实现了DisposableBean这个接口,会调用其实现的destroy()方法;
# 8. destroy-method
最后,如果这个Bean的Spring配置中配置了destroy-method属性,会自动调用其配置的销毁方法。
# 8. Spring AOP的实现原理?
Spring AOP使用的动态代理,所谓的动态代理就是说AOP框架不会去修改字节码,而是在内存中临时为方法生成一个AOP对象,这个AOP对象包含了目标对象的全部方法,并且在特定的切点做了增强处理,并回调原对象的方法。
Spring AOP中的动态代理主要有两种方式,JDK动态代理和CGLIB动态代理。JDK动态代理通过反射来接收被代理的类,并且要求被代理的类必须实现一个接口。JDK动态代理的核心是InvocationHandler接口和Proxy类。
如果目标类没有实现接口,那么Spring AOP会选择使用CGLIB来动态代理目标类。CGLIB(Code Generation Library),是一个代码生成的类库,可以在运行时动态的生成某个类的子类,注意,CGLIB是通过继承的方式做的动态代理,因此如果某个类被标记为final,那么它是无法使用CGLIB做动态代理的。
# 9. Spring 是如何管理事务的?
Spring事务管理主要包括3个接口,Spring的事务主要是由它们(PlatformTransactionManager,TransactionDefinition,TransactionStatus)三个共同完成的。
1. PlatformTransactionManager:事务管理器--主要用于平台相关事务的管理
主要有三个方法:
- commit 事务提交;
- rollback 事务回滚;
- getTransaction 获取事务状态。
2. TransactionDefinition:事务定义信息--用来定义事务相关的属性,给事务管理器PlatformTransactionManager使用
这个接口有下面四个主要方法:
- getIsolationLevel:获取隔离级别;
- getPropagationBehavior:获取传播行为;
- getTimeout:获取超时时间;
- isReadOnly:是否只读(保存、更新、删除时属性变为false--可读写,查询时为true--只读)
事务管理器能够根据这个返回值进行优化,这些事务的配置信息,都可以通过配置文件进行配置。
3. TransactionStatus:事务具体运行状态--事务管理过程中,每个时间点事务的状态信息。
例如它的几个方法:
- hasSavepoint():返回这个事务内部是否包含一个保存点,
- isCompleted():返回该事务是否已完成,也就是说,是否已经提交或回滚
- isNewTransaction():判断当前事务是否是一个新事务
声明式事务的优缺点:
- 优点:不需要在业务逻辑代码中编写事务相关代码,只需要在配置文件配置或使用注解(@Transaction),这种方式没有侵入性。
- 缺点:声明式事务的最细粒度作用于方法上,如果像代码块也有事务需求,只能变通下,将代码块变为方法。
# 10. Spring 的事务传播行为有哪些,干什么用的?

# 11. Spring 中用到了那些设计模式?
- 代理模式—在AOP中被用的比较多。
- 单例模式—在spring配置文件中定义的bean默认为单例模式。
- 模板方法—用来解决代码重复的问题。比如. RestTemplate, JmsTemplate, JpaTemplate。
- 工厂模式—BeanFactory用来创建对象的实例。
- 适配器--spring aop
- 装饰器--spring data hashmapper
- 观察者-- spring 事件驱动模型
- 回调--Spring Aware回调接口
# 12. Spring如何解决循环依赖?
https://blog.csdn.net/qq_36381855/article/details/79752689
# 13. bean的作用域
- singleton:默认,每个容器中只有一个bean的实例,单例的模式由BeanFactory自身来维护。
- prototype:为每一个bean请求提供一个实例。
- request:为每一个网络请求创建一个实例,在请求完成以后,bean会失效并被垃圾回收器回收。
- session:与request范围类似,确保每个session中有一个bean的实例,在session过期后,bean会随之失效。
# 14. Spring框架中有哪些不同类型的事件
- 上下文更新事件(ContextRefreshedEvent):在调用ConfigurableApplicationContext 接口中的refresh()方法时被触发。
- 上下文开始事件(ContextStartedEvent):当容器调用ConfigurableApplicationContext的Start()方法开始/重新开始容器时触发该事件。
- 上下文停止事件(ContextStoppedEvent):当容器调用ConfigurableApplicationContext的Stop()方法停止容器时触发该事件。
- 上下文关闭事件(ContextClosedEvent):当ApplicationContext被关闭时触发该事件。容器被关闭时,其管理的所有单例Bean都被销毁。
- 请求处理事件(RequestHandledEvent):在Web应用中,当一个http请求(request)结束触发该事件。
# 15. Spring通知有哪些类型
- 前置通知(Before advice):在某连接点(join point)之前执行的通知,但这个通知不能阻止连接点前的执行(除非它抛出一个异常)。
- 返回后通知(After returning advice):在某连接点(join point)正常完成后执行的通知:例如,一个方法没有抛出任何异常,正常返回。
- 抛出异常后通知(After throwing advice):在方法抛出异常退出时执行的通知。
- 后通知(After (finally) advice):当某连接点退出的时候执行的通知(不论是正常返回还是异常退出)。
- 环绕通知(Around Advice):包围一个连接点(join point)的通知,如方法调用。这是最强大的一种通知类型。 环绕通知可以在方法调用前后完成自定义的行为。它也会选择是否继续执行连接点或直接返回它们自己的返回值或抛出异常来结束执行。 环绕通知是最常用的一种通知类型。
# 16. Spring的自动装配
在spring中,对象无需自己查找或创建与其关联的其他对象,由容器负责把需要相互协作的对象引用赋予各个对象,使用autowire来配置自动装载模式。
在Spring框架xml配置中共有5种自动装配:
- no:默认的方式是不进行自动装配的,通过手工设置ref属性来进行装配bean。
- byName:通过bean的名称进行自动装配,如果一个bean的 property 与另一bean 的name 相同,就进行自动装配。
- byType:通过参数的数据类型进行自动装配。
- constructor:利用构造函数进行装配,并且构造函数的参数通过byType进行装配。
- autodetect:自动探测,如果有构造方法,通过 construct的方式自动装配,否则使用 byType的方式自动装配。
基于注解的方式:
使用@Autowired注解来自动装配指定的bean。在使用@Autowired注解之前需要在Spring配置文件进行配置,<context:annotation-config />。在启动spring IoC时,容器自动装载了一个AutowiredAnnotationBeanPostProcessor后置处理器,当容器扫描到@Autowied、@Resource或@Inject时,就会在IoC容器自动查找需要的bean,并装配给该对象的属性。在使用@Autowired时,首先在容器中查询对应类型的bean:
如果查询结果刚好为一个,就将该bean装配给@Autowired指定的数据;
如果查询的结果不止一个,那么@Autowired会根据名称来查找;
如果上述查找的结果为空,那么会抛出异常。解决方法时,使用required=false。
@Autowired可用于:构造函数、成员变量、Setter方法
注:@Autowired和@Resource之间的区别
- @Autowired默认是按照类型装配注入的,默认情况下它要求依赖对象必须存在(可以设置它required属性为false)。
- @Resource默认是按照名称来装配注入的,只有当找不到与名称匹配的bean才会按照类型来装配注入。